Backup WordPress Website And Run Locally On Computer With XAMPP
It is useful to learn how to backup your WordPress website and run it locally on a computer with XAMPP. This article will show you how to backup your WordPress website and load it up using your desktop computer as a virtual server with XAMPP. You can always do a test run of themes before the site officially goes live with the theme. It can also be a test bed for you to sort out bugs so that you do not need to mess with the site that is currently online.
Step 1
Download and install XAMPP and WordPress
First you will need to download and install XAMPP. This is simple and straight forward. Next go and get a copy of the wordpress. You can use any existing version that you have, in case you want your site to be as close as it can get to the version that is currently online. You will be asked if you wish to install some service, choose yes, and install those services. After installing XAMPP, navigate the file directory via Windows Explorer and go to C:\xampp\htdocs. Create a new folder there and name the folder any name of your choice. Simply extract the whole WordPress zip file and copy everything except the wp-content folder to the folder you have created in the htdocs folder.
Step 2
Download and backup your entire website
If you have your own website this should not be too difficult, but still I will go through the steps. You will need to backup 2 things, the database which is in the form of a .sql file, and all the files of the whole website. Lets do it one by one.
Backup database
You can do so either by using plugins that you can install inside the WordPress admin area. Simply login to where you will usually do so and get into the wp-admin.php section and do a backup from there. Alternatively, you can still login to your webhost’s control panel and get a backup of the database via something called “phpmyadmin”. Phpmyadmin is a place where all the “databases” are stored. It can be very intimidating to try and mess with this area if you are totally unsure. In order to figure out which data base belongs to your website, simply check one configuration file that comes with the entire backup that you hae downloaded from your FTP. There is a wp-config.php file. Open the file using any text editor such a notepad and view the name of the database there. You will know which one to backup.
w
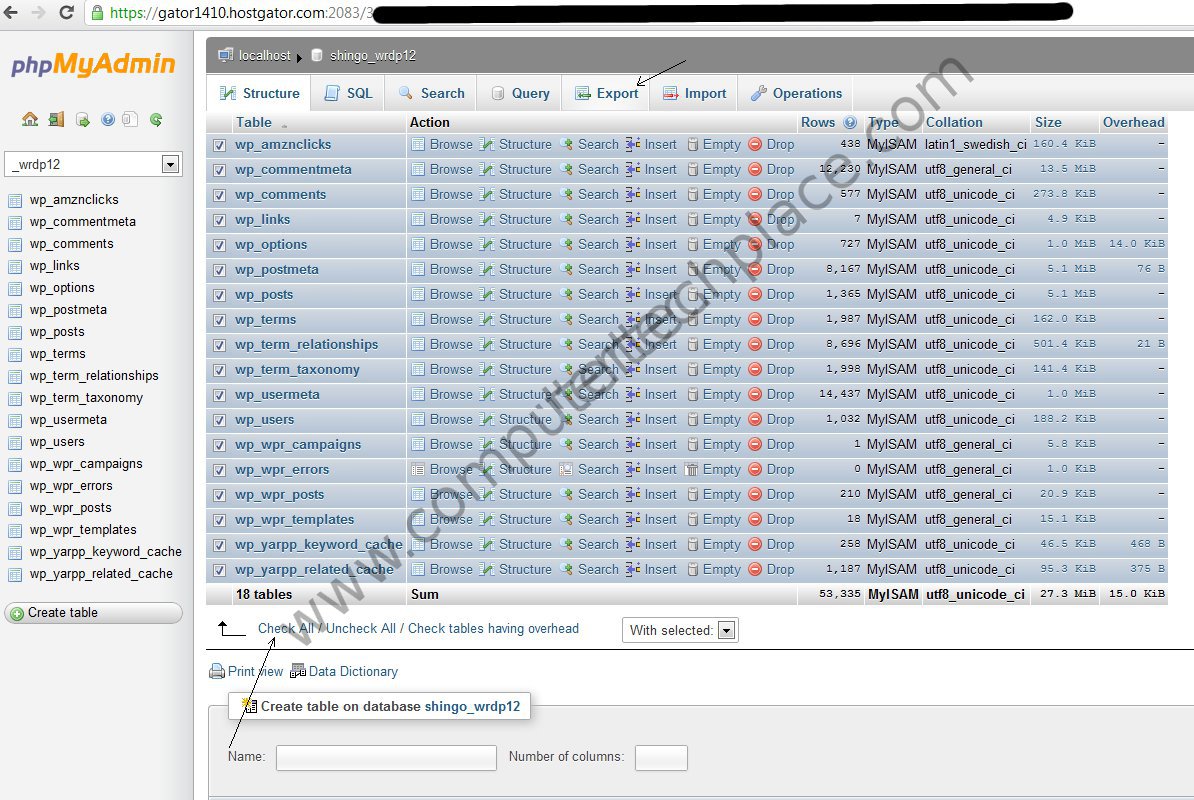
Assuming you know where the phpmyadmin is and you are already logged in. You will see a list of databases on the left side. You may only have one, and so be it. Click on the one that corresponds to the name you found in the wp-config.php file. Put a tick on all the tables and click on “Export” and save it as an sql file. Just make sure you know where the file is and we leave it alone first.
Backup website files
We can backup the entire website using ftp softwares such as Filezilla, some hosting companies even provide options to download the whole site in one click as long as you are logged in to the control panel. You can make enquries with your web host about this. Simply download the entire wp-content folder and that will suffice. There is no need to backup the entire “site”. But even if you did copy the whole site, it is okay.
Remember that we have already extracted the wordpress to a new folder in C:\xampp\htdocs?
Copy the wp-content folder of your site to the C:\xampp\htdocs\yourwebsitefolder
Step 3
Import your sql file into the XAMPP
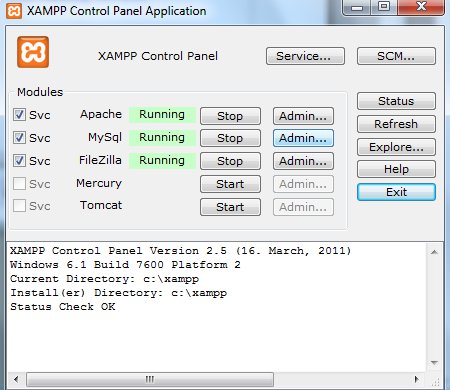
Run the Xampp control panel and you should see a small box with running services. Click on the admin button of the sql service and it will start the Internet browser with a page that looks very similar to the one in any web hosting service.
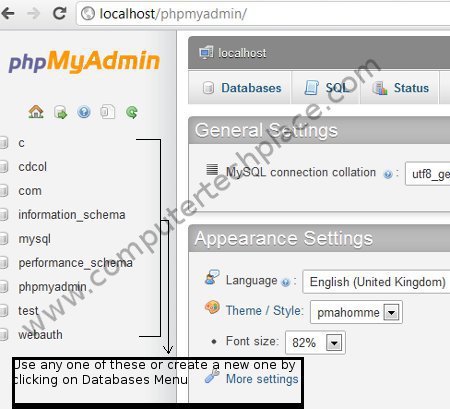
There are already a list of databases already there. So you can choose to create a new database or simply use the existing ones. Click on any of the database and hover your mouse over the “More” option and select “Import”. Browse the sql file that you have downloaded from your web host’s phpmyadmin. Some web host will deliver the file in the form of a zip, so you may need to take note if you need to extract the file before using. Once you are sure you have choosen the correct file, click the “go” button below
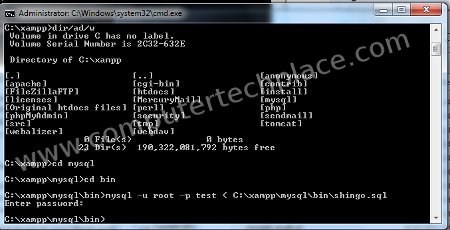
If you encounter an error that states that the sql file is too large, you will need to import the sql file manually. First, copy your sql file to the C:\xampp\mysql\bin
This is to make things a whole lot easier. Now press the Windows Key + R and type cmd followed by enter to get to the command prompt. Type the following commands in sequence
cd\xampp
cd mysql
cd bin
mysql -u root -p test < c:\xampp\mysql\bin\shingo.sql
Note that the command is just an example. You are required to replace these 3 prefixes as your own. I will underline the ones that need to be changed.
root = This is the user of the database of the localhost. Do not key in the user in your web domain. It is by default root. There should be no need to change this unless you did something different in your xampp
test : This is your database name in your localhost. Remember you need to create a database in the localhost’s phpmyadmin? The prefix you need to use in replacement of the “test” will be the one in your offline database.
shingo.sql = This one will be the database file that you have exported from your online phpmyadmin.
If you did key in the command correctly, it will ask you for the password, and it is the password of the localhost, not the webhost. Which is by default, nothing. Just hit enter .
Step 4
Editing your localhost’s myphpadmin
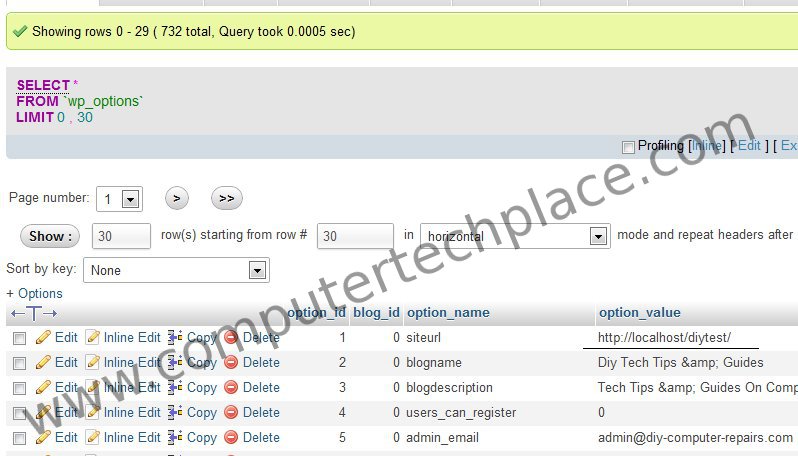
Now that you have successfully imported your database, we will need to get into the phpmyadmin to modify 2 entries. Simply type localhost in your browser and click on the phpmyadmin link at the left side of the whole page under tools. Click on the database that cooresponds to the one that you used to import to. In my case, I will click on “test”. Click on wp_options on the left side and edit the siteurl value.
Change it to http://localhost/thefoldernameinyourhtdocs
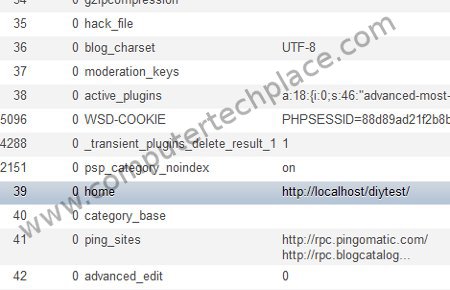
Now click on page 2 and change the home value to the same localhost url. Remember to click on “Go” button to save changes.
Step 5
Edit the wp-config.php.
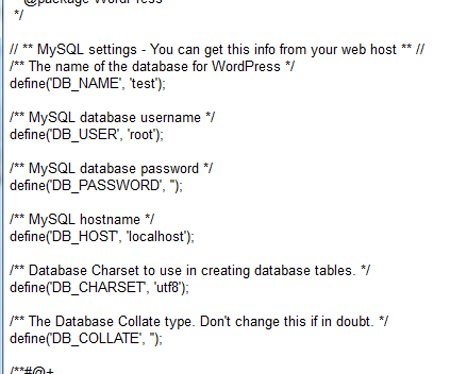
Now we will need to edit the configuration file of the downloaded wordpress site. It is located in the folder that you have created to store your website in the htdocs. Simply rename the wp-config-sample.php to be called wp-config.php
Then open that file with any text editor such as notepad. You will need to change the
/** MySQL database username*/
/** MySQL database password */
/** MySQL hostname */
The database password is nothing by default if you did not set any in the first place. This is the password that we use in the localhost. Not the one you work on online. Remember to save the text after you are done editing.
Step 5
Now simply start any browser and type into the url bar
localhost/thefoldername
In my case it is the same url that I have typed when I am editing the mysql in the localhost phpmyadmin.
localhost/diytest
If there is a need, right click on the XAMPP control panel to refresh the services.
And you should get your wordpress site loaded. Your articles may not be found if you click on any of them. Simply log in as you would normally, and change the permelinks to the old default mode and save it once. Then revert it to using of title as the link and save again. You will be able to view your articles now.
I hope this guide is useful to users out there.


Leave a comment