Create USB Snow Leopard Installer
Welcome to this article on how to create an USB Snow Leopard installer. There are a few advantages of creating a USB Snow Leopard installer. Dvds will suffer from stains and scratches over time, they are also prone to data errors in the process of installing. It does not matter if the cause is related to the drive or the disc itself. Using a thumb drive as the installer CD is also faster then using a dvd. To create a USB Snow Leopard installer, you will need a functioning Mac computer. Files attached at the bottom of the article.
Things you will need
3) Mac Book or Hackintosh system
Step 1
Extract the Snow Leopard installer dvd to an image.
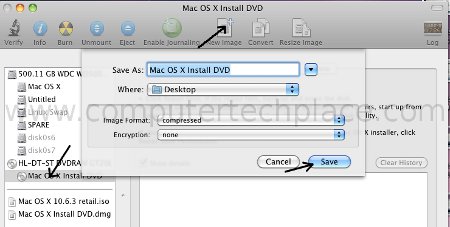
Start the Disk Utility software from the “Applications” => “Utilities” menu. Insert the Snow Leopard installer dvd into the computer’s drive. The Snow Leopard installation CD should show up on the left side. Click on the Snow Leopard disc on the left followed by the “Create new image” icon at the top menu. Click on the Dvd and not on the disc drive icon. The default settings will do fine. Save as “Mac OS X Install DVD” and save to “Desktop”. Click on “Save”. Snow Leopard will proceed to backup the whole installation CD to a DMG image on the Mac computer. This will take between 40 minutes to an hour or 2 depending on the speed of your computer. If you are using a Hackintosh like me, my Compaq laptop heats up pretty fast. I suggest you flip down the monitor of the laptop and turn the laptop upside down and check on it once a while if the job is done. Removing the battery and operating it with just the adapter helps to bring the heat down.
Step 2
Format and restore the Snow Leopard to the USB thumb drive.
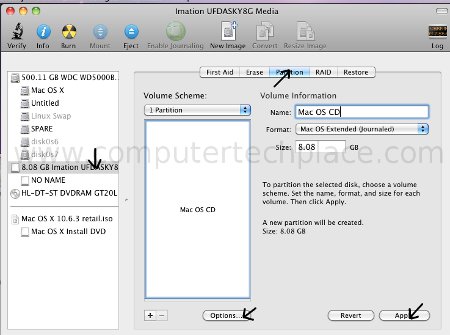
Hook up the USB thumb drive you wish to use as the Snow Leopard installer drive to the computer. Note that the thumb drive must be at least a size of 8 Gigs. Select the thumb drive that will show up on the left side by clicking on it, click on the Partition tab. Choose 1 partition from the “volume scheme”. Click on “options” and select “GUID Partition Table”. You can key in a name for your thumb drive. After making sure that you have set the respective options, click on “Apply” and wait for the formatting to be completed.
Restoring the Snow Leopard image to the thumb drive.
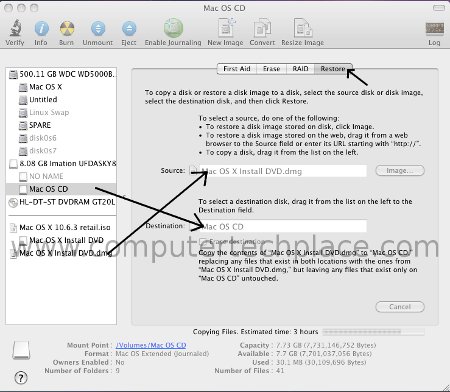
Select your formatted thumb drive by clicking on it followed by the “Restore” tab. You are required to fill up the 2 parameters before proceeding with the restore. Click and hold on to the DMG image that will also show up on the left, drag and drop it to the entry that states “source:”
Click and hold on to your thumb drive that also shows up on the left, drag and drop to the second entry that states Destination. Note you will need to drag the partition of the thumb drive that you have created and not the thumb drive itself. Click on the “Restore” button to proceed with the the creation of the USB Snow Leopard installation CD. The whole process will take pretty long, depending on the speed of the drive. If you are using a real iMac Desktop, it will take around 1 hour or so, as mentioned in other articles. But on a Hackintosh laptop running on a 5200 rpm drive. It took 12 hours plus. On a even slower drive that came with the laptop took 1 day 11 hours. I suggest users really take extreme care to ensure that your laptop do not overheat in the process. Turn it upside down and have a fan blowing over the vents is a good practice.
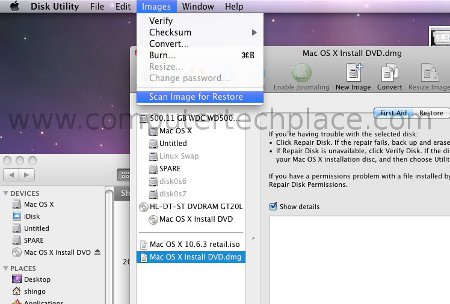
If you receive an error that states that there is no Restore profile or image found, click on “Images” and choose “Scan Image for Restore”
Step 3
Install the Chameleon 2 RC 3 bootloader package
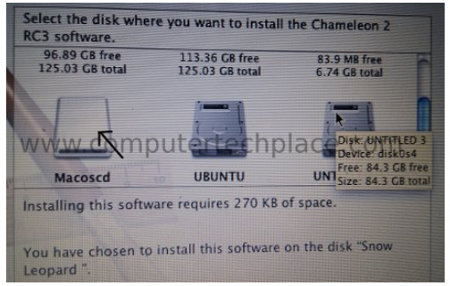
Once the USB Snow Leopard thumb drive has been created successfully, you will need to install a bootloader onto the thumb drive or else it will not autoboot by itself. Simply download the Chameleon 2 RC package and double click to install it. Make sure that you have selected the thumb drive as the destination drive. If need be, click on the “Change Install Location” to check if it is set to the thumb drive. You can scroll down to find additional drives.
Well done, you have created your USB Snow Leopard installation thumb drive.


Leave a comment