Hackintosh El-Capitan Asus Zenbook 303LN Creating Bootable Thumb Drive

It’s time to do the Mackintosh of El-Capitan on an Asus Zenbook 303LN. If you had seen my guide on how to install Yosemite, are you ready to upgrade to the next Mac OS X? There are some random glitches and freezes for the Yosemite build and thus, I feel that it is better to upgrade to the El-Capitan. And indeed, after upgrading, I do not face the random freezing and odd glitches. However, there is still one issue and that is instead of going to sleep, sometimes, it will just restart on its own. I guess, that is a small issue since I can always do a manual sleep or shutdown instead of using the auto sleep feature.
Hackintosh El-Capitan Asus Zenbook 303LN Creating Bootable Thumb Drive
So, there are a couple of ways to install the El-Capitan. One way will be to do it as a form of upgrade via Yosemite. The other way will be to create the installer thumb drive and install a fresh install. I would prefer to have the installer in the form of a thumb drive since I can always opt to do a re-install on the fly.
Things you will need to get started.
1. A functioning Mac OS.
2. 8 Gigs thumb drive.
3. Perseverance and “Dead Pool’s maximum effort”.
If you do not intend to go through the creating of the El-Capitan thumb drive, simply go through Step 1 to Step 4 and do a direct upgrade on the fly.
Step 1 – Clone out your system.
Use your preferred software to do a direct image or mirror out. This will save you lots of headaches later. In the event the upgrade fails, you can always use this backup image to restore back.
Step 1.1 – Download the El-Capitan operating system from the App Store.
This one should be the only easy step to ever exist in a Hackintosh guide. Once it is completed, cancel the installation prompt.
Step 2 – Prepare your current Yosemite Hackintosh for the upgrade.
You will need to download Clover and install it once more so that the EFI partition will show up. Remember that I mentioned before that you can install Clover as many times as you want. Simply copy all the Kexts that are already functioning fine in the Yosemite build over to the folder that is meant for the El-Capitan.
You will need to copy the files that you have from the folder 10.10 to 10.11.
Step 2.1 – Do your DSDT.
Unfortunately, you cannot run away from this anymore. If you are lucky, you might want to try to proceed with the upgrade without any DSDT file, however, based on what I have read up and Google upon, it seems like the El-Capitan upgrade will fail, if you do not have the DSDT file.
So please refer to my DSDT patching guide.
If you have an exact model as mine, you can always download my DSDT and use it. But the best approach is to patch and create your very own DSDT file since every single laptop is different.
Step 2.2 – Edit the Config.plist.
Now this is quite tricky. Do note that in the event this Config.plist is wrong, you may not even be able to boot up back into Yosemite. So, always remember to backup the original Config.plist that works for you at this point in time.
You will have to insert the bunch of codes in the Config.plist. I will attach my Config.plist so that you can use as reference. You can use my Config.plist but if it does not work for you. You will have to edit your own file.
<key>RtVariables</key>
<dict>
<key>BooterConfig</key>
<string>0x28</string>
<key>CsrActiveConfig</key>
<string>0x67</string>
</dict>
Step 2.3 – Restart your Hackintosh with the new Config.plist.
After editing and replacing the new Config.plist. Restart it once and check if your Yosemite is still able to boot up. I hope it does, because if it does not, you will have to use the Yosemite installer thumb drive as a bootable medium to boot into the Mac OS and insert back the old Config.plist. Subsequently, you will have to check, what is wrong. Is anything missing or different from the modified Config.plist. Check the brackets and commas, they are very important.
Step 3 – Finalize your Clover and install El-Capitan.
You will have to check the following and ensure that all these aspects are in place.
1. The Kexts files are copied over to the 10.11 folder
2. The modified Config.plist file is working and had been replaced as the current Config.plist file and Yosemite can start up perfectly fine without errors.
3. (Optional) Install the Clover and select the Aptio memory fix version 2. This is only needed if you get an error immediately when you try to continue with the upgrade of the El-Capitan. You can come back to install this if your upgrade of the El-Capitan fails.
4. Have you inserted your DSDT?
Once you have confirmed that everything is in place and is in order, you can proceed to double click on the El-Capitan app to start the installation. It will prompt for a reboot and you will notice a new entry show up in the Clover boot. Select that and El-Capitan will continue the upgrade from there. My personal experience is that the Clover will error with a white “no entry” sign. But you can keep trying by restarting the laptop. Try at least 10 times max and if you cannot get the El-Capitan to start the upgrade, it means that you will have to choose the Yosemite and check your files once again. My laptop will have random fail starts for a maximum of 3 times. Subsequent attempts will be successful.
Hackintosh El-Capitan Asus Zenbook 303LN Creating Bootable Thumb Drive
Now we will create the thumb drive for real.
Step 4 – Download the UniBeast from TonyMac forum.
This is also a really simple non-technical step that everyone should be able to follow. A simple double click and choose your options.
Step 5 – Install the Clover onto the thumb drive that is meant for the El-Capitan installer.
Do exactly the same for the thumb drive as per what you will do for your local laptop installation. One tip for you is to Simply install Clover on your local laptop harddisk, copy the Clover folder from your EFI partition and put it on your Desktop. Restart the laptop and install Clover onto the thumb drive. Copy the entire Clover folder that you have copied onto the Desktop over to the thumb drive and replace the contents. In case for some reason, you are unsuccessful, you may use my Clover Contents that I have attached at the bottom of the article.
Step 6 – Copy the Package folder over to the thumb drive from the Install.ESD.
Start a Terminal app and type the following command
sudo defaults write com.apple.finder AppleShowAllFiles TRUE
killall Finder
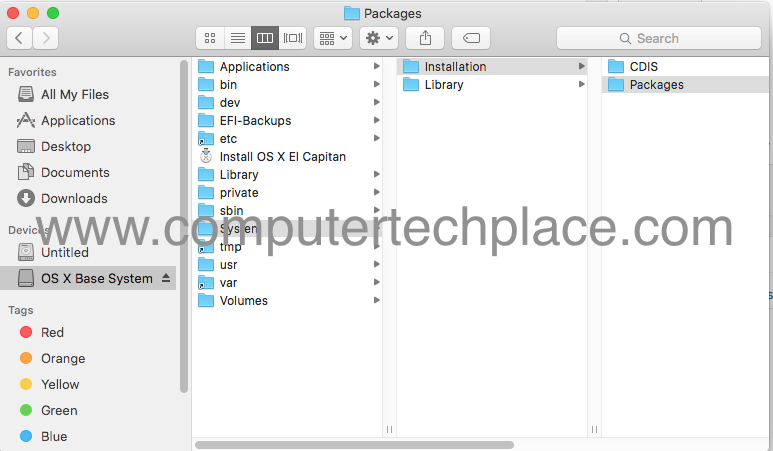
Using the Finder app, right click on the El-Capitan application and select show contents. Double click on the SharedSupport folder and mount the Install.ESD. Copy the Packages folder over to the thumbdrive => /Volumes/OS X Base System/System/Installation
Delete the entire Packages folder over there and paste the one that you copied from the Install.ESD.
Please refer to my Kexts guide on how to complete the rest of the features.
Attached Files
Leave a comment