Install DSP Manager Android
 How to install DSP Manager Onto Android
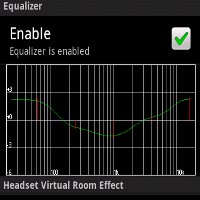
Welcome to this guide on how to install DSP Manager Onto Android phone. I am quite sure you know what you are here for, since DSP Manager is not a common app amongst Android users. This app is not even talked about often or even mentioned in a lot of articles that recommend good apps. But this DSP Manager app is one of the most sought after app for users who use Android. Put it simply, this is an equalizer app that will allow you to set levels for your Bass and Treble and this app’s setting will effect every single app that plays audio including games to movies and even Youtube videos. This app is not just a music player that comes with equalizer that alters only the sound quality of the mp3 if you use that specific music player. Files attached at the end of this article
*Note : This version of DSP Manager is outdated. It is mainly suitable for Froyo devices. Do not use this if you have Gingerbread and above
I love this app. It is simple, and best of all free. You cannot even find a paid alternative in the market place. But to get it installed in your Android phone is no easy task, it requires root access, which means you will need to have your Android phone rooted. Most stock Android phones, by default are not rooted. So you will need to follow guides out there to root your Android phone before you can install this DSP Manager.
Edit: Note. Non-Rooted Android phones can also install DSP Manager now. Check out the new update below and use the signed DSP Manager for Non-Rooted phones.
I will be showing you how to get it installed if you are using a Android that runs off an SD card off a Windows Mobile Phone. I have it working on a HTC HD 2 running Android.
Step 1
Install the Android SDK
Download the version that is meant for your operating system and have it installed. For the Windows version, it will be installed directly as a folder on the computer, in my situation, the whole Android SDK is installed on my Desktop. You will not be able to find it in the Add/Remove programs.
Step 2
Install the Android Commander
This is the software that will allow you to read the system directory of your Android phone. If you do not wish to make use of the computer to communicate with the phone, you can opt to use file explorer apps like “root explorer” for example. All you need to do is to copy 2 files across to be placed specifically in the Android directory. But in this guide, I will show you how to access the Android Phone with Android Commander as well as via the phone itself.
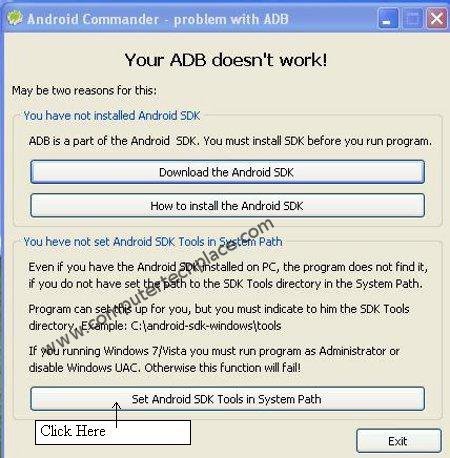
After you have installed the Android Commander, the program will say that it is unable to detect the Android SDK. you are required to set the folder by clicking on this button.
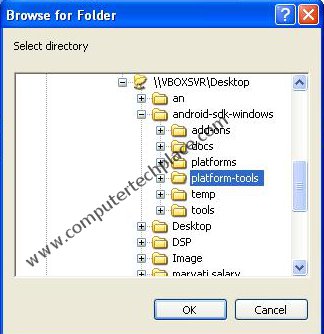
Navigate to the Android SDK folder => platform-tools folders. You will need to do a full reboot before you can use the program.
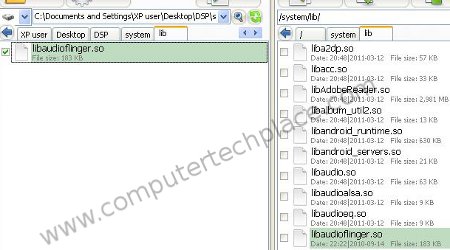
After the reboot, run the Android Commander and it will present you with a question asking you what type of Android system you have. But just choose the auto-detect option. If nothing goes wrong, you will see the contents of your computer on the left panel and the contents of your phone on the right panel. Simply put a tick on the check box on what you want to copy across to the Android phone. You need to copy these 2 files to separate locations on your Android phone.
Step 3
Install DSP Manager
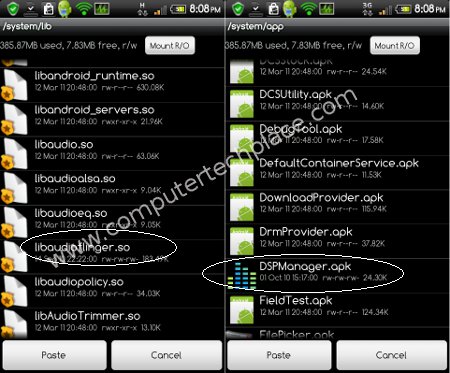
Extract the contents of the DSP Manager.zip and navigate to the “System” folder, followed by the “app” folder. You will see the DSPManager.apk file. Copy this file over to the “/” => “System” => “app” . You will need to navigate to that location first using the Android Commander software. Then put a tick on the check box of that file and click on the “Copy” button to send it across.
Now navigate from the left panel to the “System” folder => “lib” to the “libaudioflinger.so” file. Put a tick on the check box. Now navigate the right panel to “/” => “System” => “lib” folder and click on the “copy” button to send it across.
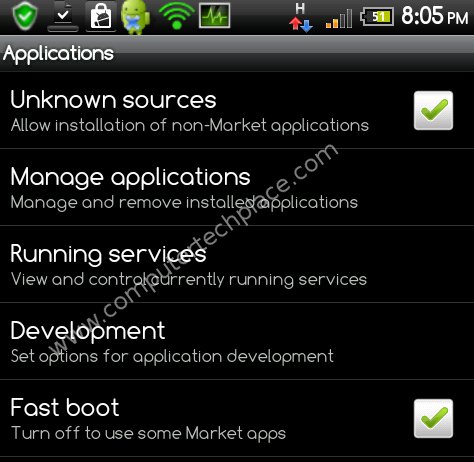
You will need to enable the option “Unknown Sources” before you can install the DSPManager.apk
You are done. Now simply navigate via your Android phone using your file explorer and tap on the DSP Manager.apk in that directory you copied to to install it on your phone. I read guides that say that simply rebooting your phone will get the same result. You can also simply copy the DSPManager.apk anywhere on your device and tap it to install it.
Now to demonstrate how to do via the device itself. You still must copy those 2 files across by your own preferred methods. Like removing the SD card and copy it across via a card reader or using ftp transfer apps.
Download RootExplorer app. You can buy it off from Android marketplace if you want. 🙂
Simply navigate to the 2 files that you have copied over simply do a tap and hold to move. Then navigate to the correct directory and hit the “Paste” button. Easy as pie. Provided the Root file software works for you.
For Android Gingerbread users, simply install the DSP.apk, there is no need for such troublesome procedures. Install DSP Manger for Gingerbread is that easy.
If you are using a Nand based Android Froyo, simply rename the whole DSP Manager zip to “update.zip” copy the file to the root of the SD card and flash the upgrade by entering clockwork mod to apply the update.
Do your settings in the DSPManager and Bingo.. Now you hear excellent music and sound from every single app that produces sound. There will be clippings because there is still a certain threshold level that the device can reach, so any frequency that is out of that level will be a “cut off” if the sound is set too loud.
** Update
Looks like the Android Commander has released a newer version that do not require you to download any form of JRE. No worries, I have updated this guide with screenshots for the new version. I have also included additional steps on how to install the newer version of DSP Manager that comes with the Bass Boost settings.
If you download the newer DSP Manager frem XDA developers, you will realize that you are unable to install if your Android phone is not rooted. No worries, it is because the apk itself is not signed. But in this guide, I will show you how to install the newer DSP Manager using the newer version of Android Commander.
Step 1
Install HTC Sync
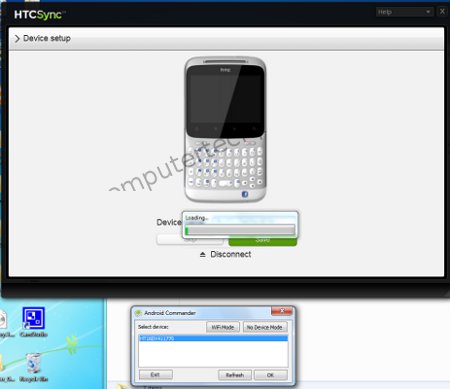
Newer Android phones now communicate with a new software that they call the “HTC Sync”. I see it as the Android version of the ActiveSync or WMDC “Windows Mobile Device Center” or whatever is the term. If you hook up your Android device via USB to your Windows computer, you will realize that you can choose between connect as drive, charge or HTC Sync. But if you click on HTC Sync, you will see that Windows will try to install some drivers and fail. But if you install the HTC Sync first before you hook up your device. Your phone will be detected in the HTC Sync software.
Step 2
Install Android Comd
Simple enough, just download the installer and complete the installation of the newer version of Android commander. If your device is already detected via the HTC Sync, Android Comd will list your device. Click ok, and it will start up into a file explorer interface pretty much similar to the previous versions.
Note, that you need to enable the “USB Debugging” and “Unknown Sources” under Settings => Applications=> Development.
Download the latest DSP Manager from XDA or where ever you can find. Using the Android Comd. The left side of the whole interface is your desktop PC, the right side is your Android phone. Navigate to your DSP Manager.apk file and right click on it and select “sign”. Notice that it tells you it needs Java. Which most of us have. It need be, just install the whole Java JRE. It will duplicate a seperate apk file for you but now it is signed.
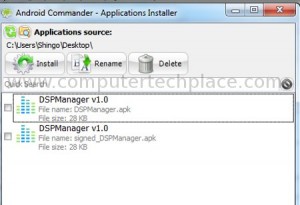
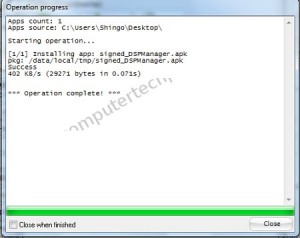
Now click on the “Installer” icon and you will see 2 DSP Manager.apk. Notice that one reads “signed”. Put a tick on that and hit “install”. Now you can choose to install as regular app, etc. Just select regular app. Bingo. Install success.
I have already attached a signed DSP manager.apk at the bottom of this article to make it simple for everyone. Just download and tap directly on your device to install. But newer versions of apps are always being updated, so I thought I will detail the specifics on how to install apps if you are not holding on to a rooted Android.
I hope this guide on how to install DSP Manager is useful and easy for all to follow




Leave a comment