Install Mac OS X Snow Leopard Onto Intel Computer

 Install Mac OS X Snow Leopard onto a PC is finally possible without complex instructions and Mac commands. Many great intelligent people such as folks from tonymac forum have evolved the whole process of installing a Mac OS onto a desktop PC until it is simple enough for non techie users to follow.
If you are like me, we ran into problems following other guides out there, wondering why it did not work out for you. While installing, you will get stuck with errors such during the detection USB, or just waiting for root devices. This is the guide for you. I am not saying that the other guides are wrong, it is just that those guides are created much earlier and thus do not know that the latest multi-beast actually will result in problems for older machines. Perhaps, the latest iboot disc is meant for the i-series processors, but people who are still using core duo setups will suffer if they follow the previous guide. This procedure really works for me.
Step 1
Hardware preparation.
Below is a list of items you must have. I will list the hardware in my PC
1. Duo 2 Core 3.0 Ghz Intel PC
2. MSI P45 Neo 3 motherboard
3. 4 Gig DDR rams [ A must to be exactly 2 sticks of 2 Gig rams ]
4. 500 Watts PSU
5. Asus Nvida 9800 GTX
6. USB Snow Leopard installer ( Read this guide on how to create one)
Any other hardware is not specifically important. You can use any hard disks, keyboard and mouse. A totally different CPU and graphics card may work as well, thus there is no need to follow as exact. Mine is just one example that works with such a build.
Step 2
Preparation of Bios
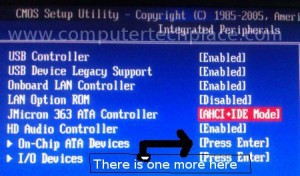
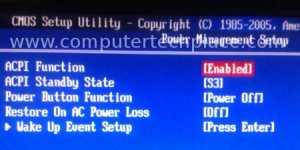
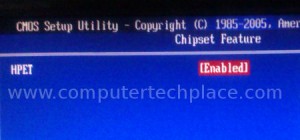
For an intel PC, there are lots of settings you need to change so that a normal desktop computer will look like a Mac computer in the installers eyes. Enter the Bios setup and change the settings respectively. Generally you need to change the options that are within the 2nd and 3rd categories. Look for options that are related to AHCI, S3 power and HEPT.
In my example, I used an Intel MSI board. I used 2 seperate hard disks so that I change switch between the 2. One is a main Windows 7 drive and the other is a fresh Sata hard disk for Mac OS. Even though you have 2 hard disks, you can still opt to use the boot device menu to change the boot device to either one of the hard disks.
Of course I can also install multi-boot on the drive that contains Mac OS, but I do not intend to mess with my current existing drive, thus I proppose the above option
There may be some differences in each individual setup and rig. I need to change my HDD mode into Raid mode before the drive will get detected in the Mac OS installation screen. Lets see what I need to set in my motherboard Bios settings.
If you enable AHCI for raid settings, Windows operating system will not boot. You must disable that particular AHCI in order to boot off the first hard disk. It may not occur for you. So do a trial and error to see if such an issue exist for you.
Step 3
Installation
For me, using iboot disc with the Snow Leopard install DVD will not work. I will get stuck in a screen that tells me that it is “still waiting for root device”, therefore I need to use the USB Snow Leopard installer which surprisingly works instead. Hook up the USB thumb drive to a USB port and boot up using the iboot disc. You will realize that the USB drive will be detected as one of the options. If you have too many partitions and drives, you will need to hit the right arrow on your keyboard and move to the end to find the USB installer. It may be out the the screen if you have too many drives connected.
Read this guide on how to create your USB Snow Leopard installer drive
Important Note: The latest iboot disc from tonymac forum did not work for me, I don’t know why. But using the older version of iboot Nvidia worked instead. If the latest iboot disc failed to work for you, download the iboot attached at the bottom of this article.
With the USB installer highlighted as the selected choice, hit “-v -x” without the quotes before you hit enter. You will enter the installation screen and basically, you can follow this guide here. The steps and procedures are totally identical
How to install Snow Leopard on a laptop to complete the whole process.
There are some similarities too, with regards to the kexts.
1) Insert the iBoot Nvdia boot disc and boot in safe mode. Install the PS/2 Keyboard kext. Reboot and your keyboard should be working now in normal mode. Just that the NumLock and scroll lock will not be working
2) Try loading a screen saver, if it works, most probably you do not need to install any Nvidia Kext.
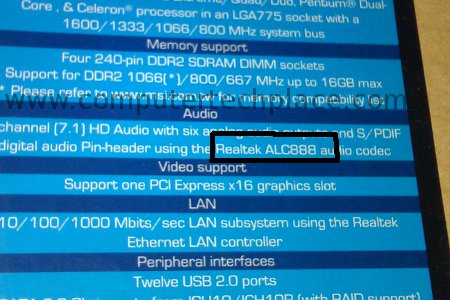
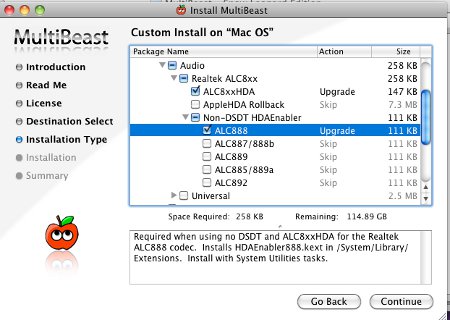
3) The audio kexts will be slightly different depending on your chip. For instance, most motherboards use Realteak audio these days, simply check up the chip that your motherboard is using and install the correct Realteak plugin from multi-beast.
Check your own motherboard box or search online for the specifics, for instance, my board looks like this. It states ALC 888.
Install the Kexts for the Realtek ALC888 by putting ticks in this manner.
After upgrading to a combo upgrade higher then 10.6, you will lose the audio functionality. Simply install this kext again, but do not put a tick on the Non-DSDT HDAEnabler, put a tick on the ALC8xxHDA and also the AppleHDA Rollback. Install and reboot and the sound will now work.

Leave a comment