Install Ubuntu Fully And Run On USB Thumb Drive

Many people will eventually crash their Windows from time to time, so it is a good idea to Install Ubuntu fully and run on USB thumb drive so that such the situation ever aries, whip out the Ubuntu installed in a thumb drive and stick it into your USB port. You can instantly gain access to your files and do your backup. Since it is a real operating system, you can still get online and do your normal web surfing while you take your own sweet time to re-install the Windows. Install Ubuntu fully and run on USB thumb drive is also useful in case you need to use a public computer, there is no need to worry about password privacy. Simply stick this thumb drive in and use it in a secure environment. I will show you how to create your very own USB Ubuntu operating system.
Note, while installing Ubuntu onto a thumb drive is as easy as selecting the thumb drive as the installation medium while you are in the installation process. But if you follow the automated installlation process, the capabilities of Ubuntu will be quite limited and it runs a little slow. My guide will include manual partitioning procedures so that the thumb drive Ubuntu will be fully usable with a decent speed.
A lot of guides out there only show you how to create a USB Ubuntu boot disk, this is the real deal where you Install Ubuntu fully and run on USB thumb drive.
Step 1 – Download your Ubuntu operating system
I suggest downloading the netbook remix version because it is a special version that has been scaled down for lower end netbooks. You may need to do a Google search and download it from torrent or other websites since it is not listed in Ubuntu anymore.
Step 2 – Burn Ubuntu into a blank CD
Make use of a software called Imgburn and burn the downloaded iso file into a blank CD. You will need this installation disc later as the primary means to install Ubuntu.
Step 3 – Start the installation
Insert the Ubuntu installation disc that you have created into your disc drive. Hook up your empty thumb drive into any USB drive.
*Note, it is strongly recommended that you unplug all your hard disks leaving only the USB thumb drive the only medium connected so that you will not erase or overwrite your main operating system accidentally. You do not need to unplug the whole drive, simply remove the sata cable from all the drives and leave it dangling. After everything is done, plug the cables back.
** I also advise users to shut down the computer, power off the main power from the wall socket, press the “on” button once on your computer, before you touch anything inside your computer’s chasis. This ensures that there is no static residual electricity that will damage your computer. It is not about you getting electriculed. LOL..
It is possible to perform the installation without having to unplug all your hard disks, but you will need to be very careful when you are choosing the partitions to modify.
If you have inserted the Ubuntu CD that you have created into your CD drive, set the correct boot priority settings, the Ubuntu OS should load up. Note that the thumb drive should be connected as well before hand. In my example, I used Ubuntu 11.04
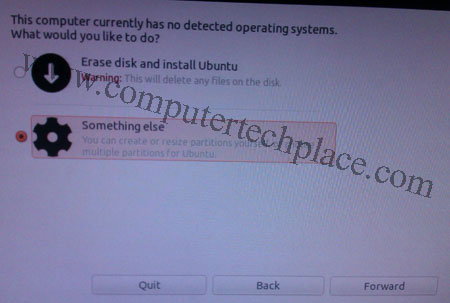
You will be given options to choose between try the OS or install Ubuntu, select install Ubuntu. Look out for a page that asks you if you want to do “something else”. Some Ubuntu installations will describe it as “specify manual partitioning”.
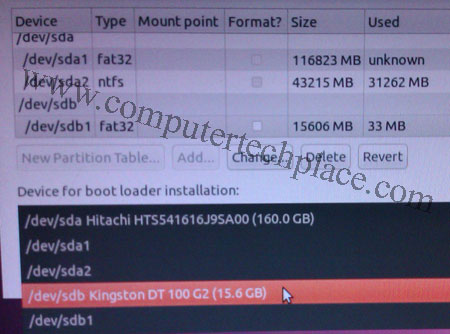
You will get to a partitioning interface. This is the place where you need to be careful. Do not mess with the wrong partitions are you will end up screwing up your whole computer. It is best you select the device for the bootloader first. That way, you will be able to identify the thumb drive’s identification ID. In my example, it is sdb. So you know that you will only modify and edit any partitions that are labelled sdb, like sdb1, sdb2 etc. Anything else, we do not touch.
Once you have set the bootloader’s device, click on the /dev/sdb and right click to delete whatever partition there is there. After deleting it, it will display “free space”. After which right click on the free space and create new partition.
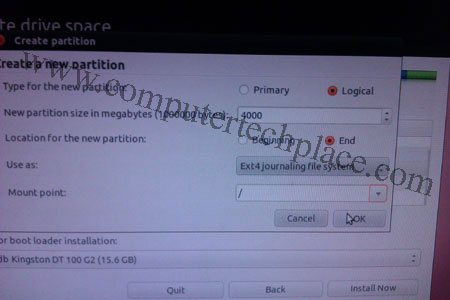
The first partition to create is an Ext 4 partition. Set the space to be bigger then 4.4 Gig, Since it is a thumb drive, I recommend using as much space out of the thumb drive so that you can at least have some extra space to install certain updates and files. The amount of space, I leave it to you. You will need to create a swap file later, so I suggest you take whatever space you have in your thumb drive, minus the amount of space you wish to reserve for swap file. Just make sure that the partition is set as “Logical” and it starts at the end of the drive. Select “/” as the Mount point.
Note, do not follow my screenshot as I have set my space as 4000MB. It is wrong. Set a higher value, I snapped this photo during my first attempt. It needs a space larger then 4.4 Gig.
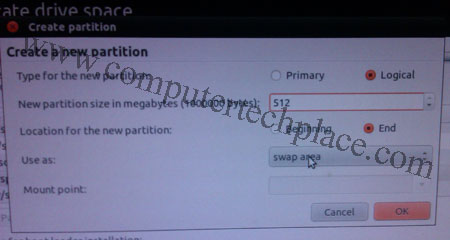
Right click on the remainding free space and create a second partition, The second partition to create is the swap partition. Set the swap to a higher value if you want, my personal feel of it is that having a higher value does boost the speed a little. But I think there is no need to go higher then 2 Gigs of swap file. Similarly, set the partition as “Logical” and let it start from the end. There is no need to set a Mount point for this.
Once you have created the 2 partitions, you can proceed with the installation. The installation will take quite a while since it is installing onto a thumb drive. Therefore I suggest making use of a thumb drive that has an USB 2.0 standard. It took around 30 to 45 mins on a Kingston 2.0, 15 Gig thumb drive.
The boot up from the thumb drive after the first install took around 3 mins. The overall experience in using Ubuntu via a thumb drive is acceptable. I feel that it is like using Ubuntu via a 1.6Ghz netbook even though my system is a Core2duo 3.0 Ghz.
But as you use it, give it 15 mins, it will feel smoother. Perhaps once the settings and configurations have settled down, it will speed up. And the Ubuntu distro I used is 11.04, I believe netbook remix version will be even better. Even though I say, give it 15 mins, that does not mean it is unusable. It is usable and responsive, but give it some time and it gets better.
Install Ubuntu fully and run on USB thumb drive is akin to having a portable operating system is very useful since you can plug in to a public computer and load up the Ubuntu. That way, you do not need to afraid of having your credentials being expose to hackers or malware.


Leave a comment