Setup Freenas 8 Using Virtualbox With Windows
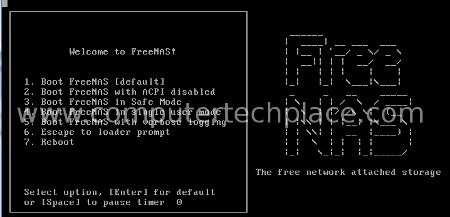
This guide will show you how to setup Freenas 8 using Virtualbox with Windows. I will include not just the instructions on how to install Freenas 8 into Virtualbox, but also how to connect to the Freenas in Windows 7. You can skip the introduction paragraph if you already know what FreeNas is all about.
Introduction
I will like to give a brief explanation of FreeNas 8 and Nas storage so that non tech users will understand what FreeNas 8 is. In the world out there, huge chunks of data on the internet are stored on something they called “servers”. Servers, put it simply are racks and racks of hard disks connected and stacked on top of one another, turned on 24 hours so that people like you and me can have access to the data.
This concept is then evolved to something smaller that can be used by common people like you and me. We can buy a physical device out there and it is called a “NAS” storage. It allows you to insert multiple fresh hard disks into a rectangular NAS box and connect to your own Wi-Fi at home. From there you can send files to that NAS box and allow multiple computers to read data from the same “NAS” box. So if one entire family has 3 laptops, you do not need to copy mp3 songs to all 3 laptops. Simply connect to that “Nas” box and you can have access to the files there. If everyone in the family contributes one song to the Nas box, the content builds up over time and everyone has access to a huge amount of songs for example. The best part of Nas is that even if your laptop crashes, you information is retained in the Nas, because the Nas is independent on its own.
So instead of buying the physical Nas device, we can make use of a software version of it and turn it into a Nas box. One simple way to put it will be as such, you can go out there and buy one DVD player to play DVDs, or you can download softwares that will turn your computer into a DVD player. Bingo~, that is what setup freenas 8 using Virtualbox with Windows is all about.
Setup Freenas 8 Using Virtualbox With Windows
Step 1
Prepare and install Virtualbox
In this article, I will teach you how to install and setup Freenas 8 using Virtualbox with Windows. Even though the Freenas 8 software recommends that you install onto a thumb drive. It is better to install and run Freenas 8 from the virtualbox.
1. You can configure everything such as wireless interfaces from Windows instead of trying to use text commands
2. The laptop/PC itself will not be fully taken by FreeNas 8 and you can minimize virtualbox to one side and still have a computer to use
3. You do not need to burn an extra disc out of the downloaded Freenas 8 iso file.
Download and install Virtualbox. Reboot and let Windows be done with the configuration of Virtualbox settings. Run the Virtualbox software and we will proceed to create the “hard disk” for your Freenas 8.
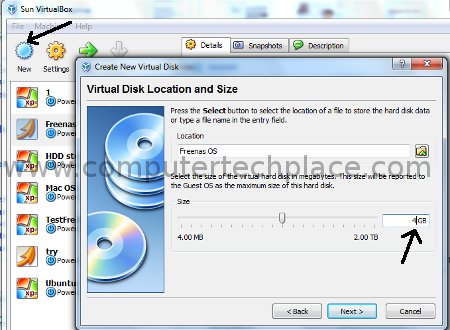
Create 2 hard disks using Virtualbox. Click on “New” => “Next”
The first hard disk is the smaller installer that is meant for the Freenas 8 OS, under the “Name” field, just type something, say Freenas 8 OS
There is no need to change the amount of memory. 192 MB, so be it. Click on “Next” followed by “Create new hard disk”, Choose “Fixed sized storage”, and click “Next”. Adjust the size to 4 gigs for the first hard disk. This is the amount of space to install Freenas 8 OS. It is more then enough. Under the location field, simply type a name. If you already have a “Freenas 8” image created from any previous installations, you can click on the browse icon and navigate your directory to point to any Virtualbox .vdi files. It will load that file. After setting the parameters to create the new hard disk, click “next” followed by “Finish”. A new 4 Gig file will be created saved somewhere in your computer. But that is not really important, because it will show in Virtualbox later on on its own. And there is no need to do any backup on this file, because you can always re-install in the same manner in any computer.
Create another hard disk using the same procedures above.
I suggest using an external USB hard disk instead of creating the “hard disk” out of your own drive. In case your Windows crashes, you can simply unplug your USB hard disk and you know that your entire Freenas 8 worth of data is safe from harm, if the need should ever arise where you need to format your computer.
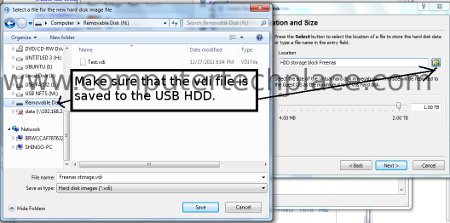
This time round, set the size of the hard disk as big as your USB hard disk. Take note, do not specify a size that is exactly the size of your USB hard disk. Set a smaller value, if for some reason, the value of the created vdi file exceeds the size of your USB hard disk, it will hang half way while trying to create the hard disk. One very safe margin is to set a file size 1 Gig lower then your USB drive. Just set a different name for the new hard disk, say call it “HDD storage block Freenas” for example.
The only difference is that you will click on the browse button and navigate to your USB drive. Key in a filename and let it create a .vdi file on your USB drive. The bigger you wish to create, the longer it takes of course. Just let it create and go grab some soda or watch some movies.
Additional settings
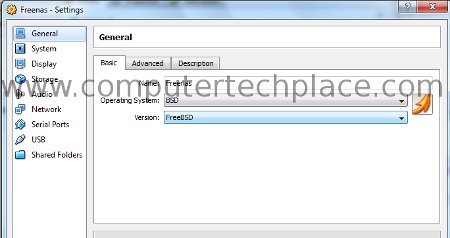
Now the basic preparations are done, let’s setup the Virtualbox to use the hard disks that we have created. Click and highlight on the “Freenas” that should now show up on the left side. Click on the “Settings” option at the top. Under “General” , change it to BSD and FreeBSD
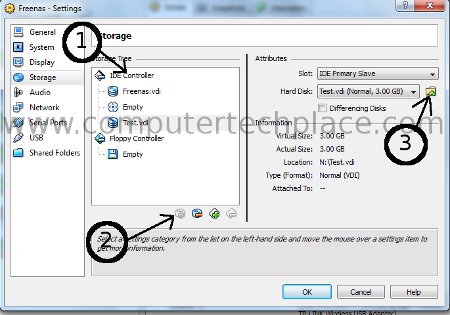
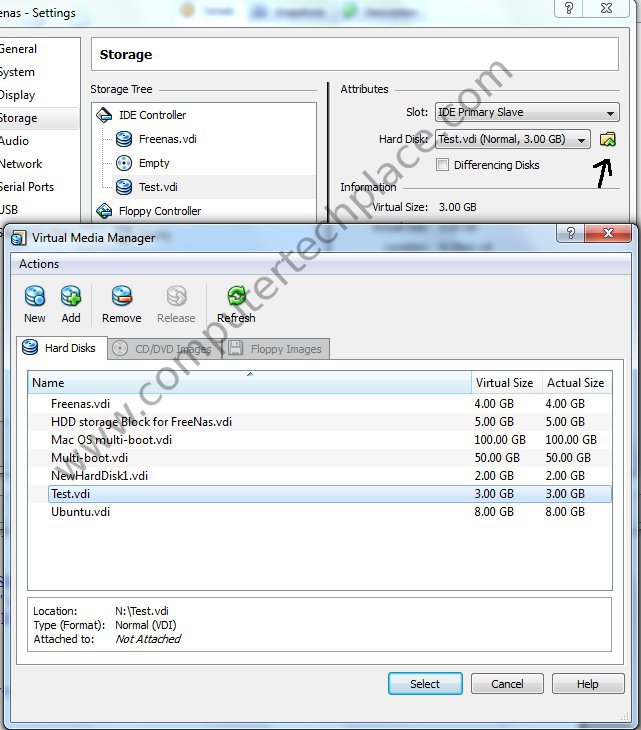
Click on “Storage” and set as shown in the screen shot. Let the CD point to the FreeNas 8.iso that you have downloaded from the Freenas website and click and highlight the word “IDE Controller” also add one extra HDD and let it point to the USB hard disk.
1) Click on the IDE controller or the add hard disk icon will not be clickable
2) The add hard disk icon
3) Browse to your USB hard disk which contains the vdi file that you have created.
Step 1.1
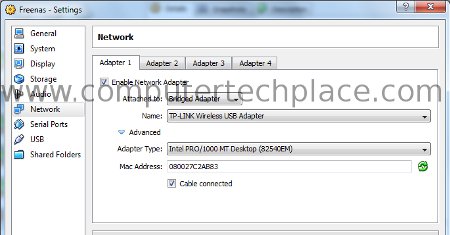
Click on “Network”, by default most users use “NAT”. If it does not work out later, during the assigning of IPs, you can come back and try all the options one by one. You must reboot and allow the Freenas 8 to load to see which one eventually works for you. Of course your computer must have internet connectivity in the first place. Click on “ok” to exit this screen.
Step 2
Run Freenas 8
Click on the green arrow “Start” to run the Virtualbox. The moment the Virtualbox starts running, tap F12 repeatedly until you get to a black boot selection screen. Hit c on your keyboard and it will load the Freenas 8.iso, provided you did point to the downloaded Freenas 8.iso file correctly. If it all goes correctly as accordingly, you will see a screen like this.
[At any point in time if you wish to jump out of Virtualbox, simply tap the “right CTRL” of your keyboard to get out of the Virtualbox window]
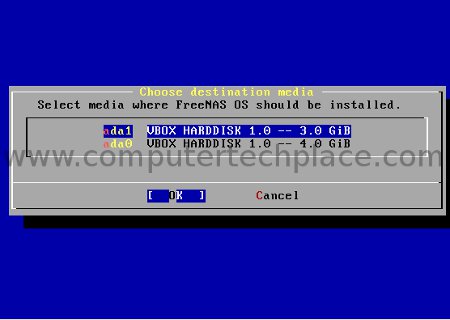
There is nothing to do, just wait and it will start the installation by itself. Select option 1. Install/Upgrade to hard drive. The next screen will ask you which drive you want to install to. It should be obvious enough to you that you will choose the 4Gig drive. The larger drive is to be used as the storage later on. When Freenas 8 installs itself to the drive, it will take up the whole drive. It will not care if it is a 100 TB drive, if you install it to the wrong drive, you will waste the whole drive. I know my screen shot looks stupid, I have a 3 Gig and a 4 Gig drive. This is because, I am using a 3 gig thumb drive as demonstration. Can’t be bothered to wait for a few hundred gigs to be created. 😛
You will be presented with a warning that it will erase all data. Just proceed, make sure you have not selected the wrong drive. There will be 2 warnings including one that suggest using of a thumb drive. Just say yes, and install.
Let it install, it won’t take too long. Once completed, hit ok and it revert to the first installation screen. Choose option 3 and it will reboot. After rebooting, Virtualbox may load the Freenas 8.iso again. So simply click on the “devices” option at the top menu of Virtualbox and select “unmount CD/DVD device”. It will issue a warning, but just force unmount. After that, click on “Machine” and select “Reset”.
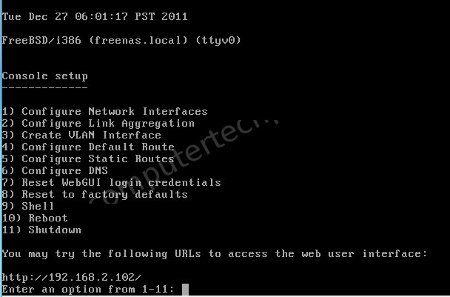
Now you should see a bunch of text fly off the screen and once again, just wait. Nothing to choose. Freenas 8 will eventually boot up to a text interface showing one IP address. Leave it as it is. Start your internet browser. Any browser, Firefox, Chrome or Internet Explorer and key in the IP shown there.
Step 3
Setup Freenas 8 using Virtualnbox with Windows
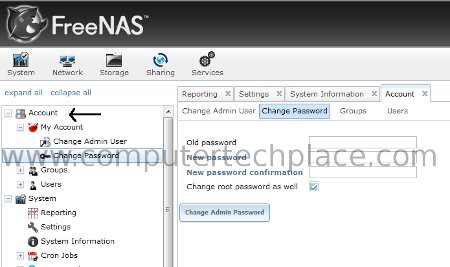
Half the marathon is already done. Phew, now there’s more work. Grab some coffee or something before you continue. First you will notice a red flashing icon at the top right corner that says “Alert”. Click on that to change your password. There is also no need to click on that icon. Simply click on “Account” => Change Password.
You must remember the password because you will need to log in from now on. If you did not change the user ID, the default is “admin”, password will be the one that you just set for yourself.
Add Users / Groups
You can add users or groups specifications to organize your Freenas 8. But to make things simple, just add one group and one user. There is no need to set any ID prefix, the default will do, just key in a name for the user or group and it will show up later on.
Mount your Volume
Put it in layman’s terms, this is called adding your USB hard disk / drive space so that we can use it.
If you are adding a fresh hard disk.
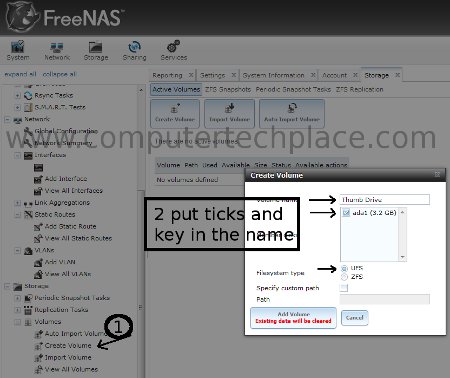
Click on Volumes => Create Volume.
Key in a name for the volume, basically it is just a name to define the USB storage.
If you have created a volume previously, and you just re-formatted your computer, but your USB storage has the vdi file. Install back virtual box, Freenas 8 and make sure that you have re-attached the USB storage in virtualbox correctly. You may need to even remove the previous setting and re-attach even if you only rebooted your computer.
In order to add the USB storage back correctly, under Virtualbox, click “Settings”=>”Storage”. Click on the “browse” icon, check if your existing USB hard disk is already listed there. If need be, highlight your USB storage vdi, click on “Release”, still selecting that USB storage vdi, click on “Remove”.
You will be asked if you wish to keep the vdi file. Select “Yes”. Or else all your data will be gone.
Then add it back again as a fresh entry. Once you have added the volume, you are almost good to go. There is also another option called export, which is to equaivalent to unplugging the USB drive. There are options to destroy the data, so be careful with the export command. If you export the volume, before you can import it back, you must reboot the Freenas 8 in the Virtualbox and log in again using your browser or you cannot import that volume.
You will need to add the Sharing specifications before you can gain access to the storage. Click on the “Sharing” opion and you will see generally 2 types. One is AFP which is for Mac computers, and CIFS, which is Windows computers. And the 3rd, NFS, while, I am not too sure either. If you want to connect to the Freenas 8 using Windows, then set for CIFS Shares, for Mac computers, set for AFP shares. You can set for both if you have Mac and Windows computers.
Set for Freenas 8 for Windows Sharing
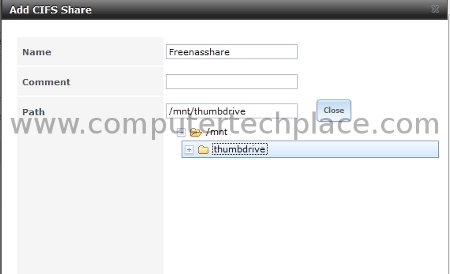
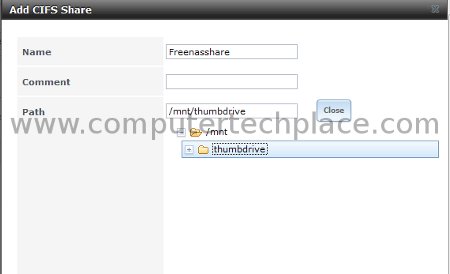
Click on “Sharing”=> “CIFS Shares”=>”Add CIFS Share”
You need to fill up just the “Name” entry and set the path to point to your USB storage. The name you put here is important, you will need to use it later when you try to connect with your Windows computer. Put ticks on allow guests if you want. Allow guest makes it a whole lot easier because you do not need to key in login passwords all the time. You also do not need to maintain the “Users” and “Groups” by setting too much passwords. But you can go play with all those settings if you want, in general, my guides go in the direction of making things real simple and hassle free. Click on “ok” so that the settings will be written.
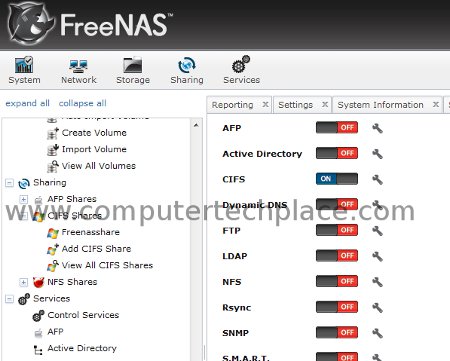
One last step is to start the respective Services. Click on the Services => Control Services and turn on CIFS. Note if you have not set a new password yet, you cannot turn on the Services. If you have set for Mac sharing, turn on AFP too.
Step 4
Connect to your Freenas 8 using Windows
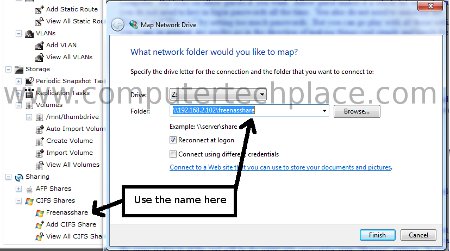
Bam, now how was that, still alive? This is the last bit to go. Click on the start menu of Windows 7 and hover over “Computer”, right click and select “Map network drive”
Key in your location in this manner, use the screenshot as a guide. Take note of the placement of the \\ and the omit the http://. The IP address will be the ones that is in the brower’s URL bar and the name to key in at the end will be the name you entered for your “Sharing” settings. In my case, I called it Freenasshare
Boom. Done. How was it. Mind boggling and was that a long tedious march to the north pole. Now you can have your important files stashed safely away in a independent NAS server built with Freenas 8. I hope this guide on how to Setup Freenas 8 Using Virtualbox With Windows is easy for all out there to follow.
Attached Files


Leave a comment