Install Android HTC HD 2 Internal Nand Memory

 Hello, and welcome to a guide on how to install Android directly onto the HTC HD 2 Flash Rom, which in other words, it simply means going hard core and flashing the whole damn Android operating system right into the internal memory of the HTC HD 2 without a safety net by going through the SD card.
Veterans who have fooled around with Android on HTC Windows Mobile handsets will know that there is a way to dual boot Android and Windows by hacking their phone so that they can run Android on HTC HD 2 which is less risky then flashing the Android directly into the internal memory
But there are pros and cons of running off an SD card. Pros will be that you still have the Windows Mobile to fall back to in case any thing goes wrong and removing the Android and re-installing it is as easy as copy and paste. Cons will be that it is slower and you will experience lag very often and very often “force close” errors if the device shuts down by itself suddenly when it runs out of battery juice. Of course such errors can be easily rectified by overwriting a copy of the data.img file that is not corrupted yet before the shut down, but trying to maintain such a backup measure and system is very tedious. Files will be attached at the end of the article
So for those who want to go for the real deal by flashing Android into the Rom of your HTC HD 2. This is the guide for you. First of all, I wish to warn people that if you are not experienced enough, please do not follow this guide and jump right in. It is very dangerous and risky. I suggest you do the SD card version first. If you can succeed with the SD method of loading Android, then you can consider going the the Nand version. Please read the disclaimer and if you wish to proceed with this guide, I will not be responisble for any damages caused to your phone if anything should go wrong as a result of mis-interpretation of my guide or your device might not be suitable at all.
I will give the pros a few heads up on flashing Android the Nand way.
1) It is not so scary even though it does carry some risks. If you have already done the HSPL flashing and installed a custom Windows Mobile rom, you are quite safe and cleared to proceed with a Nand flash
2) Even if all hell breaks loose, just power up and hold on to the volume down key and enter the Tri-colored screen and flash a Windows Mobile Custom Rom back to your HTC HD 2. Simply hook up your “crashed” phone via USB to your computer and if you have activesync installed on your desktop PC, the HTC phone should be detected even though it is dead and you can proceed to start the Leo_SoftwareUpgrade.exe that comes with every rom package.
3) If you “brick” your phone, don’t come and kill me. All instructions and credits goes to the developers from XDAdevelopers.com.
Step 1
Preparation and confirmation
Make sure that you have already “hacked” or HSPL-ed your device. If you are new to all these terms, read the guide on how to install Android onto SD card for HTC HD 2. The first part
on how to install HSPL and radio firmware are totally similar. Please ensure that you have
1) 2.08 HSPL
To check that you have the correct HSPL, press the volume down button as you are powering up the phone and you should see the tri-colored screen that reads the HSPL to you. Generally, if you have a functioning dual boot, or Android running off SD card in your device, you are quite safe

2) A new radio firmware of version 2.**.50 Use the 2.12.50 version should be safe enough. If you are unsure if you are using the correct radio, simply download the package and flash it one more time. Connect the phone via USB to the computer and hold the volume down key as you are powering up the device, in the tri-colored screen, start the Leo_SoftwareUpgrade.exe to flash the radio over.
3) Charged up enough battery before starting any form of flashing to Nand. Because once you use the Magldr loader, the device will not stay off when you try to charge it. It will wake up and stay at the Magldr menu. I am not too sure if the device itself is being charged at that moment in time.
Step 2
Install the Magldr loader
Hook up your HTC HD 2 to your computer via USB cable. Press and hold on to the volume down button as you power up the phone. You will get to the tri-colored screen. You will hear some audio prompts that are similar to when you hook up a USB hardware.
Note: You must have Activesync ( XP) or Windows Mobile Device Center (Win 7) , installed on your computer. Check to make sure that your phone can be detected and its contents can be accessed while you are still using Windows Mobile 6.5 before you proceed with the flashing of Magldr.
Notice that there should be a text that states USB at the bottom of the tri-color screen. Download the Magldr file and double click on ROMUpdateUtility.exe to proceed with the installation of this special bootloader to your HD 2. If you are using Vista or Windows 7, you may need to right click and run as administrator. After the installation is complete, you will now have nothing on your phone except the plain Jane text interface. At this point in time, please do not leave it on, if you are reading instructions just take the whole battery out or else the whole device will drain out.
In the event should you really end up in a shitty situation where you screw yourself in with a flat battery, don’t worry, download the Magldr 1.10 and flash it in. Simply hold the volume down button while you are powering up the device and enter the tri-colored screen. Start the Magldr 1.10 installer and flash it across. Then quickly select the last option and power down to charge your phone before you turn it on to up-flash it to the latest Magldr 1.13

Now you need to check if your SD card is readable and can be used. With the SD card in your HTC HD 2, hook up via wired mode to your desktop computer and choose option 4 “USB MassStg”. If everything goes smoothly, you should see a new drive show up in your Windows system. Within 10 secs. If nothing shows up, it means your SD card cannot be used and you need to change to another sd card. I have tried a few types of SD card, and it seems like those with large capacity like 16 gig with high speed data read and write will not be detected.
Step 3
Install the clockwork mod
In case you might not know what this is all about, put it simply, in order to install an Android into the internal memory of the HTC HD 2, we need a special software to copy the files in. This is the application that will help us write the files onto the device. While it may sound complex with the description “install” used as the term for this process. It is as simple as copy and paste the files of this “app” or “software” or how you wish to see it deem fit to the root of the SD card. I have to put it in the simplest form for all to understand. In the XDA forums, they will describe it as install the clockwork mod.

Note that there are various types of “clockwork mod” for you to use, as the Android versions get more advance over time, the developers will also create newer clockwork mods for you. I will provide one clockwork mod in this example taken from the XDA forum. Download the clockwork zip and extract it. Copy the initrd.gz and zImage file over to your blank SD card. You may also wish to copy the Nand Android of your choice in the form of a zip over to the SD card too.
You can choose to copy the files when the HD 2 is hooked up as a drive via Magldr or simply take out the SD card and copy using your computer, it works too. My system will freeze up if I try to copy via Magldr.
Step 3.1
Now to run your clockwork mod

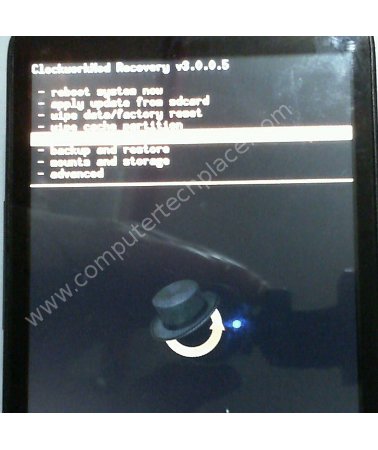
Insert back your SD card into the phone if you have not done so already. Using the Magldr menu, go to option 2. Boot AD SD. If every goes well, you should see the new text interface, which is the clockwork mod. There are various options in this clockwork mod and it is very much advisable to always do a wipe of both the data cache partition as well as the doing a factory reset, before you install another Nand Android in. This is to prevent and force close errors in the new build you are going to install into your device.
Optional step
Partition your SD card for apps
As the Android build gets bigger and bigger, the developers at xda have already foreseen the day where by the phone itself will not have much free memory left after flashing one full Android rom, therefore, a lot of newer roms are heading toward a format which they called it “A2SD+” feature. This means that if you prepare a partition in your SD card, all the apps will be stored in the SD card instead of clogging them all in the internal memory. You can search the xda thread for that keyword and if the Android rom you have chosen has that feature, they will list it in their description. Here’s how you partition your SD card via clockwork mod.

Follow steps 3.1 to enter the clockwork mod. Use the volume up and down buttons to and press the “green call” button to enter the “Advanced” option. Use the volume button to navigate to “Partition SD card”. From there you can choose between the different sizes. 1024 meg is more then enough. For the swap file, choose 0.

Wait for the partition to be done. It will take quite a while. Be patient, probably around 5 minutes plus for a 1024 partition.

Step 4
Install your Android to Nand
I will use this build here as example, since it is simple enough and stable for a beginner to try out.
Simply copy the downloaded files from the site to your SD card as a zip on its own.
HyperDroid-CM7-v5.3.0-Jumping_Jaguar-magldr-signed.zip
CM7v2.0.1Hotfix.zip
Enter the clockwork mod and navigate to “install zip from SD card”, followed by “Choose zip from SD card”. You should be able to find your zip file, choose that. You will be given a screen of options with only one being the “yes”, the rest is no. Navigate to the one “yes” option and you will be warned severely that this is not reversible. Just say yes and let it install.

For this example, it is relatively fast. But for other builds that are more advanced will take a long time. A general guide will be files that are 300 meg in size. These types will build will look like it has hanged in the process of flashing. But no worries, give it a max of 30 minutes, and if it still freezes, then you might wish to give it some more time before pulling the battery out. Note that you have to make a choice. Because if you wait until the whole battery is drained, you may be in trouble, because with Magldr installed, you can never charge with the phone shut down, and if you do not have an OS in, you can never enter a system to start charging, unless you purchase a special charging dock just for that battery.
After the first boot, reboot and press and hold on to the “red hang up button” of your HD 2 and enter the Magldr. Choose Option 2. Boot AD SD to enter the Magldr again. This time round you will need to install the “fix” or “patch”. Most builds will have patch and fixes over time, so you need to check the page for details. In our case, we have already downloaded it, it is the CM7v2.0.1Hotfix.zip. Rename it to update.zip before transferring it over to the SD card. In the clockwork mod, choose “apply update from SD card”. Next, select “choose zip from sd card”. It is quite similar to installing a rom. Let it install and then reboot. The update will be applied to your build

If you end up in a stuck state of affairs, simply remove the battery, and while holding on to the volume down button, power up the phone. Enter the tri-colored screen, hook up via USB and quickly flash a custom Windows mobile rom from the xda developers and make your phone Windows mobile again so that you can charge the phone up before attempting another Andriod flash. You can use the Leo Cookie custom rom.
http://nrgz28.sylvester20007.com/Leo/Cookie/index.php
Just pick one, don’t panic and download all, also check the language, do not flash a Italian rom and in the end you do not know how to read the menu. I pick one that is safe enough for you.
Now if everything is in order, you can set the default loading mode in Magldr to load the Android right off without asking you. Hold the “red hang up” button when you are starting up the phone to enter Magldr. Navigate to option 10 : services. You can set the default to boot off as Nand.
All Nand Android builds are flashed pretty much in this manner, but they have some difference, please read the instructions that are written by the develoeprs for the specific builds. They usually contain details on which clockwork mod to use, to do a complete wipe first, how many times you need to reboot or wait how long before the build will be loaded.
Leave a comment