Create a Windows 8 PE With PGP Support
With the Windows 8 operating system rolling out in full force to the general public, it makes practical sense to look into creating of a Windows 8 PE as a contingency plan should your operating system crash and you are unable to recover your data. In my guide, I will include additional tips on how to create a Windows 8 PE disc with PGP support so that even hard disks that are encrypted with PGP will be able to salvage their data with a PE disc. The best part I love about the Windows 8 PE is that it is so fast and responsive. You can even add plugins to tap into new technology such as USB 3.0 so that you can copy data out of your crashed Windows 8 operating system with blazing fast speeds.
Pre-requites to take note of.
1) You will need to have a Win 8 installation CD as the source to create the PE.
2) You will need to re-construct the install.wim if your cd only comes with install.esd (I will explain this in detail further in depth later)
3) Internet connectivity for the download of additional files.
Step 1 – Download the Winbuilder for Win8 PE.
Download the Win8 Winbuilder that will help you create the PE. Once you download it, it comes in the form of a zip. Extract it and paste it in a single folder in the main c:\ of your computer. Double click on the Win8PESE82_Builder.exe to get to the GUI interface of the program.
Step 2 – Set the source
If you are not going too deep into customization of the build, all you need to do is simply set the source and click the play button. The source points to the Win 8 install CD. Note that you can actually copy the contents of the whole CD and paste it in the computer’s drive as a single folder and point the source as that folder so that the reading and writing will be a whole lot faster.

Click for larger image
Step 3 – (Optional) – Re-create the install.wim
Now in case the Winbuilder runs into issues trying to get the files needed and it states that the install.wim is missing. This is the part where you will need extra hard work to get going. While the easy way out is to download an iso that comes with install.wim or even just grab another disc that comes with an install.wim and simply replace the file that is needed. However, this Winbuilder loads a boot.wim as well, which means that the boot.wim and the install.wim must perhaps be from the same disc. I have tried replacing install.wim from another disc and it failed. So here’s how to create the install.wim.
For IT pros out there, I will keep it short and simple, you need to generate the file by doing Sysprep to the Windows 8 OS and capture the image out using imagex. If this line sounds totally WTF are you talking about, read on and I will show you how.
Install a fresh Windows OS
I strongly recommend that you do a fresh install to generate the install.wim as the sysprep as executing the sysprep will restore your whole Windows to a factory reset state. Unless it is okay for you to lose everything, lets do an alternate installation.
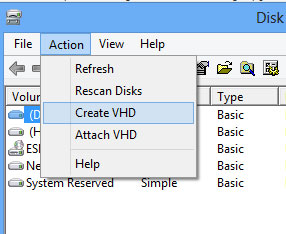
Using your current Windows operating system, press the Windows Key + R and type diskmgmt.msc. We will create a new virtual disk for the new Windows installation.
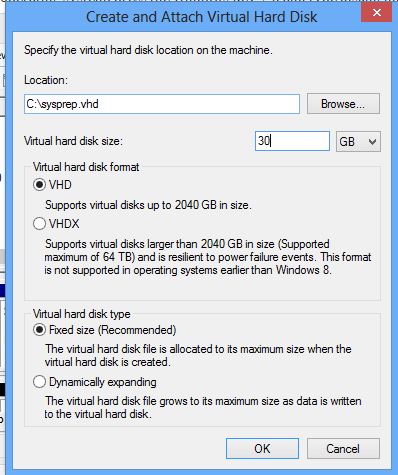
Point the path to where you want it to be and give it a name. Give it like 30 Gigs which is more then enough for a basic no frills installation. Anyway we are going to delete this OS after it is done with the capturing of the install.wim. It will take quite a long time to create, so just leave it be. Do not attempt to disrupt the process. Wait until you are able to attach it by using the same diskmgmt.msc. If it says, the disk is in use, just leave it. It means it is still creating it.
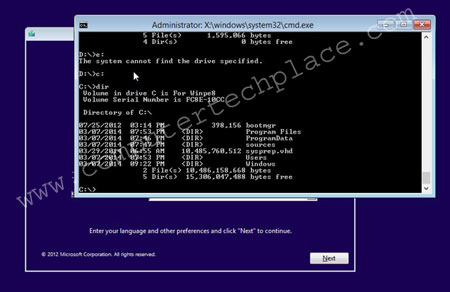
In order to install the Windows OS onto the VHD, you have to do the installation as what you would do. The only difference is that you have to attach the VHD when you are in the Windows installation so that the VHD will show up as one of the drives you can use. Now as the Windows installation CD is booting up, press shift + F10 to see the Dos prompt. Find the c:\sysprep.vhd first. It may not be c:. It may end up in d: or e: depending on how many drives you have. Some Dos command knowledge is needed at this point. Use the dir to find it.
Once you locate it, you will have to attach it. Assuming it is at c:\ and the file created is called sysprep.vhd. The commands to type will be
diskpart
select disk 0 (assuming you only have one disk, run “list disk” to see if there are others to select )
select volume 1 ( assuming that the drive is volume 1. run “list volume” to see all the partitions)
Select vdisk file=”c:\sysprep.vhd”
Attach vdisk
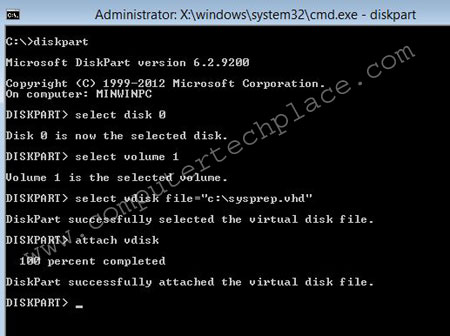
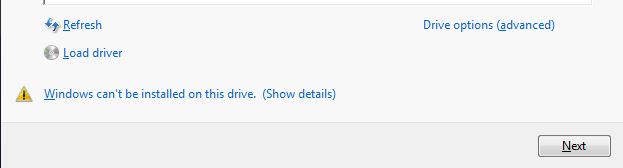
Once you have successfully attach your vhd, simply click out of this dos prompt and continue through the entire Windows 8 installation. Choose custom install instead. You should be able to see the smaller virtual disk show up as one of choices that you can choose as the install destination. Ignore the prompt that says that the OS cannot be installed on this drive. Amazingly, the next button can be clicked.
Complete the whole installation and now you can choose to boot up between your original operating system and the newer one that is meant to be Syspreped.
There is a sysprep folder in your c:\Windows\system32
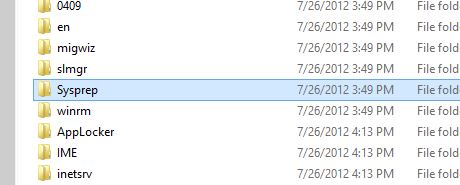
Simply run the sysprep.exe and choose the OOBE and select shutdown instead of reboot.

it will take a while to complete the preparation of the operating system before shutting down the system.
3.1 Capture the image
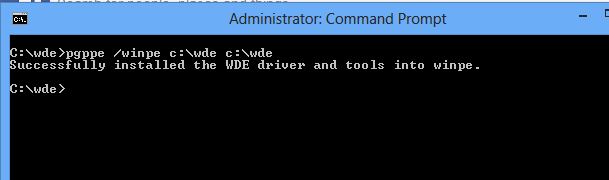
Now in order to capture the install.wim, you will need to use the Win 8 installation CD to do so. Simply boot up the Win 8 CD and use the shift + F10 to bring up the command prompt. Attach back the vhd that you have created using the same commands as above, except that now, it contains a full installation of Windows that we have just “syspreped”
Run DISM command to capture the image. Now note that you will need to have at least another drive or partition to capture. You cannot capture and save onto its own drive. So assuming that the vhd is now attached as e: and I intend to save it over to c: as a file called install.wim This is the command to run

Now you will get a file in the c:\image.wim. Simply rename it to install.wim and paste it in the folder that contains the entire Win 8 installation CD. Now you can click the run button of the Winbuilder and it will proceed to build the Win 8 PE.
Step 4 – Insert PGP plugins.
If you encrypt your system with PGP, it makes perfect sense to have a PE that comes with PGP injected. The marathon is only half complete, you have another half to run. Once the Winbuilder is done with building the whole PE. Navigate to C:\builder\ISO\WIM\sources. There is a boot.wim there. You will need to inject the PGP into this boot.wim
By default, you have to install the PGP software and consolidate the files needed to inject the pgp. Once again, I will be the nice guy and have the necessary files ready made for you to use. The ones here are for the 64 bit PGP. So, if you end up creating a 32 bit PE, you will have to extract the 32 bit versions of the PGP files yourself. Download it here.
Extract the files to a folder in C:\ and put the boot.wim together in this folder. Make the name short and sweet so that the injecting of the plugin will be less confusing. Rename the boot.wim to winpe.wim
Once you have successfully injected the plugin, rename it to boot.wim and paste back to C:\builder\ISO\WIM\sources
Step 5 – Burn it
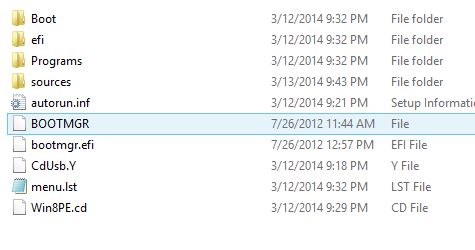
If you think that it is so simple, you are wrong. LOL. But we are at the final bits now. For some reason, if you burn it direct, it may BSOD. If you use a very clean no frills Winbuilder build, you may stand a chance having it work without the additional steps. Lets say if you get a BSOD, follow the additional steps. If not. Simply burn the following folders into a disc and it should work. Navigate to C:\winbuild finalize\ISO\WIM. Burn all the files here as it is in the directory structure. Copy and paste over. You can even do so to a thumb drive and it should work.
If it does not work for you. Get Imgburn. We will need to first extract the boot of your Windows 8 CD. Start Imgburn and choose write Files and folders to disc. Choose Advanced tab => bootable tab. For the source, choose the Win8 CD and save it.
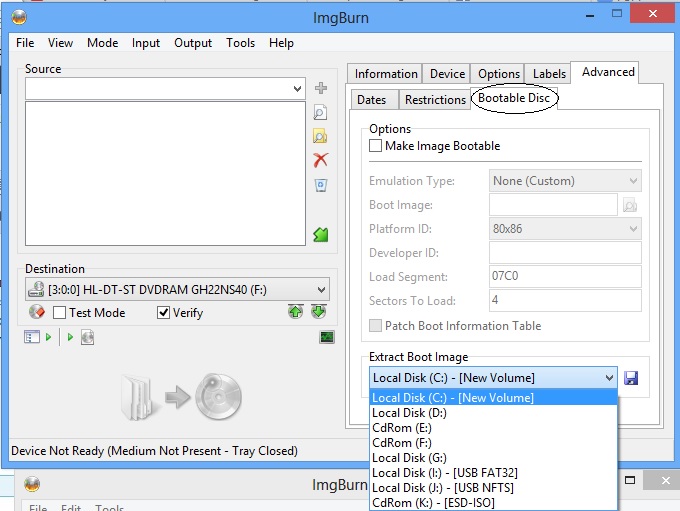
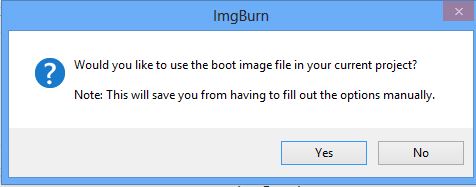
The next prompt, imgburn will ask you if you wish to use it now. Choose yes
Imgburn will fill up all the options for you and you can now drag and drop all the files and folders that you need to burn into the Imgburn interface. Finally BURNNNNNN.
Phew. Damm. Is it all over? Yes it is over. Finally, you have a PGP injected Windows 8 PE disk. I know this is crazy, but when you have tons of information you wish to recover from a crashed system locked in a PGP encryption. All these procedures will be worthwhile when you can get your data back.
Enjoy and I hope this guide is useful to whoever is reading it.
Leave a comment