Easiest Way To Create Windows 7 PE Bootable CD With PGP Plugins Injected.
Man~, it’s like running a triathlon and I have finally succeeded in a easiest way to create Windows 7 PE Bootable CD. After reviewing all the past cases and infusing all the commands from Symantec, help forums and blogs. I present to you, the easiest way ever to create Windows 7 PE with PGP plugins injected.
I work in a IT industry and it is a requirement whereby it is a must to have all the users computer encrypted with PGP WDE. And when they crash their computer, it becomes a hassle to remove their hard disk, plug it into a computer with PGP pre-installed, and copy out the files. The rescue disk from Symantec works, provided that the Windows OS can load up, or you will waste a few days waiting for it to decrypt, and in the end? Just a blank HDD with nothing.
With this method, you can simply pop in the Windows 7 PE bootable CD with PGP plugins and have access to the drive that is encrypted. No hassle no mess and there is a special directory program called Q Dir that by passes all forms of user permissions so that you can pull out anything unless they protected their accounts with password.
Easiest Way To Create Windows 7 PE Bootable CD With PGP Plugins Injected.
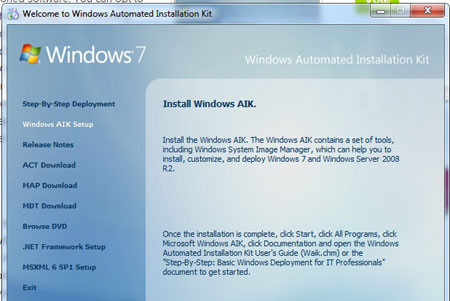
Step 1 – Download and install the WAIK
Oh right. Boring as hell, get the link here and mount the iso and install it like how you will do with any software. Choose “Choose Windows AIK Setup.” . If you need extra help, do give me a buzz. I will try to keep the basic tech stuff off so that this guide won’t be as long as a thesis.
Step 2 – Gather your PGP files.
You will need a bunch of files from your PGP program. Listed on the Symantec website.
http://www.symantec.com/business/support/index?page=content&id=HOWTO64225
• pgpbootb.bin
• pgpbootg.?bin
• pgppe.exe
• pgpstart.exe
• PGPwde.exe
• stage1
c:\windows\system32
• pgpcl.dll
• PGPsdk.dll
• PGPsdkNL.dll
• pgpsdkUI.dll
• pgpwd.dll
• pgpwdesdk.dll
• shfolder.dll
• pgpiconv.dll
c:\windows\system32\drivers
• PGPsdk.sys
• PGPwded.sys
As usual, I am the good guy here, I have already packed the files into a zip for you to download, and yeah use it if you want. But in case it does not work for you due to difference in my version and your version, please proceed to extract the latest files yourself. Create a folder called “wde” and paste the extracted files in there.
Step 3 – Create one set of PE folders.
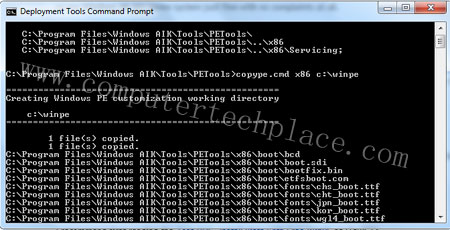
To explain this in layman terms, in order to create a Win 7 PE boot disk, Windows needs to gather files all over the place and needs them in a network of folders. So instead of doing this manually, we make use of the WAIK to do this for us. Go to Start Menu and under the Microsoft Windows AIK, there will be the Deployment Tools Command Prompt. You must right click and run as administrator. Type this command
You will get a new folder in your C:\winpe_x86
Just leave it there for now.
Step 4 – Install Make_PE3
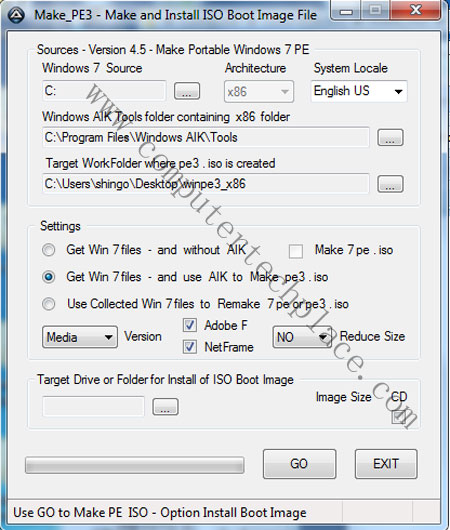
Download and install Make-PE3, download the Make_PE3_45.exe. The rest are plugins, if you want to use them
You must extract it to C:\ and run the Make_PE3.exe as administrator.
Select the 2nd option to Get Win 7 Files and use AIK to make Pe3.iso. The only place you will change is perhaps the target folder where you can put it as Desktop so that it will be easy to find later. There are 4 versions to choose from, Min, BS, EXP, Media. Basically they mean fewer things or more things. Once done, click Go
Optional
If you want to add programs and customize your Win 7 PE, it is best to use portable apps to make things real easy. Simply copy the whole folder and paste it into the respective folder of the build you are building. For example
C:\Make_PE3\PE3_mod\PE3_add\x86\Program Files
If you intend to use the flash plugin provided by the Make_PE3 link, simply download the exe and extract the contents.
Simply copy the folder and paste it as accordingly to the directory structure it is created when you unzip the plugin. If there is a registry file, copy it and paste it accordingly as well.
Go make some coffee while this thing runs. Once it is done, there will be a folder on the Desktop for my case. It is called winpe3_x86.
Navigate to
C:\Users\shingo\Desktop\winpe3_x86\ISO\sources
Cut the boot.wim and paste it into the C:\WDE folder. Rename it to winpe.win
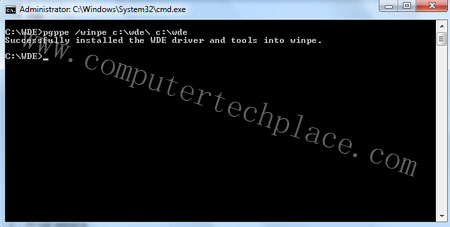
Using your Start Menu, search for cmd.exe and run as administrator. Type the following commands.
cd\wde
Copy the winpe.wim from wde folder and paste it into
C:\winpe_x86\ISO\sources
delete the boot.wim there and rename the winpe.wim to boot.wim
Click on the start menu and look for Microsoft Windows AIK,
Start deployment tools command prompt as administrator and run this command
oscdimg -n -bc:\winpe_x86\etfsboot.com c:\winpe_x86\ISO c:\winpe_x86\winpe_x86.iso
The iso will be output at C:\winpe_x86 and named winpe_x86.iso.

Burn it into a blank CD and volia . Your trusty Windows 7 PE with PGP plugins injected. In order to use the PGP commands to access the disk, run the command prompt from inside the Win 7 PE and type the following commands.
Below are the PGPWDE commands that can be run from the command line to mount a PGP encrypted HD. Enum is to enumerate list the available drives. Status will tell you if the drive is PGP enabled/encrypted. In the Auth line replace xxxx with your passphrase to mount the drive. Note: Those are double dashes in the command switches except the -p “xxxx” which is a single dash.
pgpwde –enum
pgpwde –disk 0 –status
pgpwde –disk 0 –auth -p “xxxx”
pgpwde –h
Damm. Was that easy or what? If you enjoyed this guide, subscribe or visit my site for more such guides in future. I hope this guide on easiest way to create Windows 7 PE with PGP plugins injected is easy for everyone including non techs to follow.
Attached Files


Leave a comment