File Sharing Network Mac OS X With Windows 7
Having multiple computers is common these days, therefore it is useful to known how to Network Mac OS X with Windows 7. If you Network Mac OS X with Windows 7, you can transfer files directly across the different operating systems without having to upload to cloud services or transfer via thumb drives or other forms of media. In fact netwoking Mac OS X with Windows 7 also allows you to share your internet with each other in case for some reason, Wi-Fi is down or whatsoever. In this guide, I will cover sharing of internet connection between Mac OS X and Windows 7 ,transferring of files and sharing of folders across these two platforms.The procedures are similar for both wireless and wired.
Configure network settings for Windows 7
1) Turn on network discovery
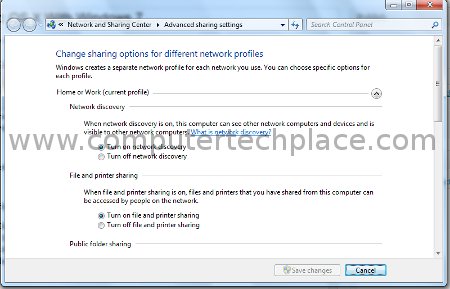
Press the “Windows Key” and start typing right awasy. Key in “Advance Sharing Settings”. Turn on all the settings in that page. Especially “Network Discovery”, if the other settings like printer sharing do not apply to you or you do not wish to share your printer, you can turn it off. If you want to allow access without a password, you can turn off the last option. In this example, I will turn it on so that it is more secure.
2) Share your drives/folders
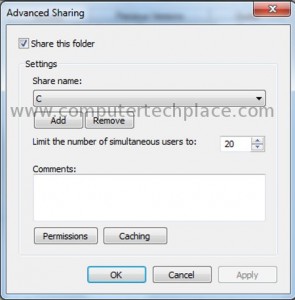
You will need to share your folders or even whole drives before this Windows 7 can be accessible to the Mac OS X. Right click on any folder or even whole drives and select “Properties”. Click on the “Sharing” tab. If the folder can be shared without much risks, you will be able to click on the “Share .. ” button. Else you will need to click on “Advanced Sharing”, put a tick on “Share this folder” check box. Key in a name or simply use the default. Click apply and that folder will be able to be accessed from the Mac OS X computer
3) Hook up your ethernet cable
Connect the ethernet cable with or without a router. I will not explain how the connections should run in this article since this article is about the software aspect of networking. Also check that you have turned on LAN support in your Bios Setup screen.
4) Create a new user account (Optional)
If you have an administrator account that does not use a password, you will not be able to connect to the Windows system on the Mac OS X side. So you will need to create a new user with a password. Unless you have enabled the setting to allow network sharing without a password in step 1, or you have a password actually in your user account, then there is no need for this step. The setup in Windows 7 is now complete.
Configure Mac OS X network settings
1) Click on “Settings” => “Network”
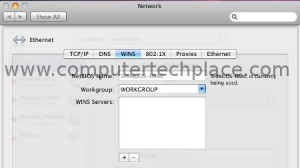
Select one of the connections from the left and click on the “Advanced” button. For me I choose Ethernet. For most users, you may be choosing AirPort instead. Click on the “WINS” tab and key in the Workgroup name that corresponds to the name that is used in the local LAN net. For most average users, we use WORKGROUP.
2) Click on “Settings” => “Sharing”
Under sharing, enable the services you wish to run under the network, such as file sharing etc. You will also need to put a tick on the user account that is to be shared. You can change the permissions of guests to read and write if you wish to make things simpler. Click on the “Options” button and put a tick on “Share files and folders using AFP” and “Share files and folders using SMB (Windows). Put a tick on the accounts you intend to share below.
If you have these 2 settings set, you should be able to see Mac OS X in the Windows 7 explorer. You may need to key in login credentials if you try to access the mac directory. Use the same login you need to login into your mac computer.
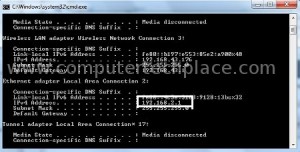
In order to access Windows 7 folders from Mac OS X, you will need extra steps. First of all, you will need to identify the IP address of the Windows 7 OS It is usually a combination that starts with 192.168.*.*
Using your Windows 7 operating system, press the “Windows Key” + R, type “cmd” without the quotes and hit enter. Type “ipconfig” without the quotes and hit enter. Locate the ip address.
Now using your Mac OS X, open the Finder and hit Command + K. If you are using Hackintosh, then it is Alt + K. Key in the value that you have found in the Windows cmd prompt and click connect. Note that you need to use smb instead of afp. The first 3 characters are important or you will not be able to connect. For example. smb://192.168.2.1
The next screen you will see is actually a menu that will ask you how you which folder do you intend to connect to. Sometimes, to simplify things, you can choose to share specific folders instead of the whole drive. So that when you need to share songs, simply connect to the folder that contains all the songs etc.
Bingo, you have connected to the Windows 7 file directory.

Leave a comment