How To Install Clock Work Mod and Recovery HTC HD 2

 Hello, and welcome to this guide on How To Install Clock Work Mod and Recovery HTC HD 2, if you are trying so hard to flash a Nand based Android rom, you will know that this article is precious to you. Else it is just as alien as greek to you. This article focuses on doing a flash on a Windows Mobile device. So if you are holding on to a Android set by default, please do not follow this article.
Let me do a brief explanation on all these tech jargons that you see in XDA developers forum, CWM, Recovery, 150 + 5 recovery and all that jazz. I will also include screen shots and attach files if applicable at the end of the article for users to download if you find the XDA too messy and hard to navigate around for the correct files. Credits goes to all the XDA developer creators. I will also link the respective pages to their post so that you know where I get all these stuff from.
I will list all the stuff you need to do in sequence so that if you follow the order I have set, you should be able to flash any Nand rom without issues.
I will assume that you have done HSPL and upgrading of the Radio and I will omit those instructions. Those are really the basics of installing Android on HTC HD 2 and are by default “done” before you even think of embarking on a Nand flash. If you do not know what I am talking about in this paragraph. Please do NOT ever proceed with any form of flashing or installation after this point. You can post questions and I will try to answer you. Do not damage your device.
How To Install Clock Work Mod and Recovery HTC HD 2
Step 1
Install the Clock Work Mod using Magldr 1.13
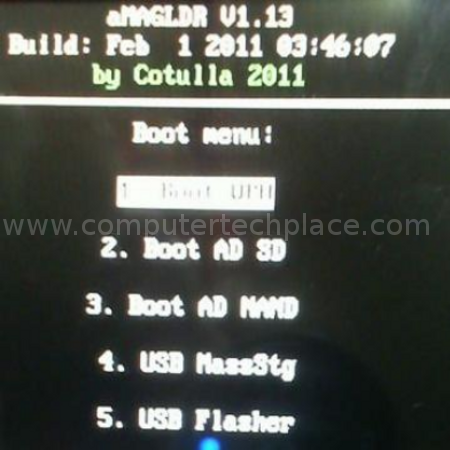
This is a program that is specially created to replace the operating system in your HTC HD 2. It means that after installing this package, you will not have anything in your phone. What is left will be a text menu interface. This is what I will call it the “program” that allows you to install Andriod without going through your computer. This program is a very special creation that can launch Windows Phone 7 roms, Android Nand Roms and even “Android SD Magldr” variants. If you have existing Android roms installed, you will need to hold the “red hang up” key in your HTC HD 2 to enter the menu during startup or it will by pass this menu and start your Android if you have set it to start Android by default.
Step 2
Install the recovery partitions
What is different with Android compared to Windows Mobile is that in order to install Android into the internal Nand of a device, you will need to split the internal memory into various partitions. Just like before installing any operating systems, you will need to partition your computer.
You will see the XDA developers post in such a form “150/5 MB system partitition “. Basically there are 3 prepared recovery systems to choose from. 150 Meg, 250 Meg and 400 Meg. In case you do not know exactly how to set the partitions correctly, simply install the value that is bigger then the stated values in someones thread.
http://forum.xda-developers.com/showthread.php?t=1044830
To put it simply, this program will partition your internal ram of your HTC HD 2 so that the Android can be installed. Every build that is listed on the XDA developers will list which recovery you need to use to install. In some cases, the author of the specific build will include a custom recovery of a different file size. Then you will download and use the one that the author has specifically attached on his post. To install a recovery, simply extract the contents of the zip that you have downloaded. You will see folder with Daf.exe.

Connect your HTC HD 2 to your computer with the USB cable and enter the Magldr. Select “USB Flasher”. Wait for it to get detected. You will see a completed text shown in this manner ( USB…USB ) . If you don’t see that, you cannot flash. You may need to reboot your computer and try again.
After which, if you are using XP, just double click on Daf.exe. For Windows 7, right click on the Daf.exe and select “Run as administrator”. After that you will see some text on your HTC HD 2. It may ask you if you wish to retain or clean up the existing data. Unless you know what you are doing, just choose clean up the data and make new partitions. If you are performing an upgrade to a newer version of a rom released by the same author. But the author may now decide to use another recovery which is of a different size, that is where you can opt to retain your data.
A Nand build of Android is special, unlike SD builds which will require you to key in all the information from scratch, unless you retain the “data.img”. But SD cards are pretty much less stable and will always result in force close errors. The personal data and settings of a Nand build is totally isolated from the Android OS. You can install a totally new build and you may be surprised to find that your settings are intact as it is. But developers will recommend wiping instead of retaining.
Detailed explanations
I will use this Nand Rom for HTC HD 2 as example. In that post, you will see the author post the requirements as such
-MagLDR with 280 system partition with at least 5 mb cache
OR
-CLK with 280 system partition with 5mb cache
If you see such a specification, for the less techie groups, you will go ahead and download the 400 meg recovery from this link. But for the more advance users, I will teach you how to modify any of the recovery images to flash the exact values required for the rom. If you flash as exact as it can get, you will have more space for your apps. For instance, download the 400 meg recovery and extract the contents. Open the “flash.cfg” file using notepad. You can modify 3 values.

For this example, you will change the 400M to 280M and the cache to 5M. You may also wish to change the first value to 5M if the rom reboots during installation. But for me, I think it is just luck. I will use another example.
For this rom , Notice the specs is
EU (8/220/10 ext 1024MB)
Or if you are going to install themes 8/230/10
T-Mobile (8/320/10) (optional sd ext 1024mb for a2sd & dalvik cache)
Or if you are going to install themes 8/330/10
Or if you are going to install themes 8/330/10
In this case, you will need to change the first value from 1M to 8M, second value to 220M or 320M or 330M depending on your choice. And the cache from 4M to 10M. Notice that there is a ext 1024MB setting? You can create this by using the clockwork menu once you enter Step 3. Using the ClockworkMod Recovery, use the “advances” option => “Partition SD card” => Choose the value you see on the specifications, which in this case 1024 meg.
Save the config file and flash using the instructions above.
Contingency plans
In case you encounter issues where by after running the Daf.exe of the the clock work mod flash partition recovery program. It shows this error message.
An error has occurred
Read below for more information
Error Description: USB init failed
Info: .\RSPL\RSPL.cpp (736)
Error Description: EnterBootloader missing
Info: .\RSPL\BootLoader.cpp (176)
But you are very sure that you have hooked up the phone via USB and entered Magldr correctly. Even the option 4, USB Flasher shows the initialization correctly. But it just refused to flash. Try the following ways to rectify.
1) Make sure that you have right click the Daf.exe and “run as administrator” if you are using Windows 7.
2) Make sure that you have these two files in the folder together with the Daf.exe
1. EnterBootloader.exe
2. rapitool.exe
If these 2 files are missing, I have attached them in this article below. Download the Daf files and put them together with the flash recovery package that you have downloaded from the respective sources.
3) Flash back a custom Windows Mobile Rom and allow the device to boot as Windows Mobile. After allowing the Windows Mobile device to be linked via ActiveSync or WMDC. Flash the Magldr, notice that there is also the daf.exe in the Magldr package. Use the daf.exe if you are flashing across to Windows Mobile. Else use the RomUpdaterUtility.exe if you intent to flash by entering the tri-colored screen.
Try again and it should work.
Alternate method of flashing Clock Work Mod Recovery partition
The XDA developers have already prepared a even simpler method of flashing the recovery partitions. In any event you wish to skip all the complex configurations on how to partition the device. You can opt to download one whole entire compilation of pre-configured partition sizes. Simply choose one of the correct sizes that is meant for the rom you want to flash and put the nbh file together with the customRuu.exe file. Hook up your device via USB and enter the tri-colored screen by holding down the volume down button while turning on the phone. After the flashing is complete, use step 3.1 and download the adb drivers followed by the clockwork recovery file. Simply download the partition rbh pack.
Step 3
Starting the recovery
After installing the program from Step 2, you will be able to start the program to install your Nand Android. They call it “Clock work mod recovery”. Simply press the “home” button as you are powering up your device and hold it there as long as it is and if everything goes well, you will enter another program menu.
Step 3.1 ( Optional )
Installing the Clock work mod recovery via text commands
Installing the Clock work mod recovery has evolved greatly and to install it is as per instruction on step 2. But in case you are unable to install the CWM recovery successfully in the easy way, there is a way to install it by using your computer to flash the CWM recovery across. If the CWM recovery package that you have downloaded has the Daf.exe, most likey it is the easy way out. If the CWM recovery package has a file ending with a .nbh extension, it means you need to do it the hard way.
I am sorry you may not be able to choose and use one easy CWM and hope to use it all the way for all your Nand builds. Some times, complex builds may attach their own CWM. Thus it is the developers choice to decide if they want to release a .nbh type or a Daf.exe version.
One example of the more complex clockwork mod recovery
http://forum.xda-developers.com/showthread.php?t=901305
You will need to download the CWM 3.0.14 link. The zip will be a .img file. You will also need to download the RUU 1.3.3 link, which is a rbh file. You will also need to download the Google drivers. Link attached at the end of this article.
Extract the CustomRUU.exe file from any Windows Mobile 6.5 rom flasher package. If you have done any form of flashing of custom roms, you will know that there is one file called the CustomRUU.exe in any of those packages. If you need that file, it is attached at the end of the article as well. Simply put that CustomRUU.exe file and the “RUU_signed.rbh” together in the same folder.
With the HTC HD 2 hooked up via USB to the computer. Hold down the volume down key as the phone is powering up, while you are inside the tri-colored screen, run the CustomRUU.exe file. If you are using Vista and above, right click and run as administrator. You will notice some activity on your phone itself.
It will reboot by itself after installing and what you get is just a screen full of text and it is stuck there. Holy shit, did you just damage your phone? Relax.. chill. It is correct. Just a bunch of text and nothing else.

Still connected to your PC, download the Google Android drivers and extract them to a folder. Go to your device manager in the control panel and you will notice a new device called “Android Phone”. I suggest you extract the contents to a folder called “Android” and put them directly in C:\
So that it is easier to run Dos commands later. If you are using Windows 7, simply hit the Windows Key and start typing away. Type “device manager”. Right click on the Android Phone device and select update driver software. Choose “Browse my computer for driver software” . Browse the directory to the Adb driver package that you have downloaded and let it search. If everything goes smoothly, it should update and look at your HTC HD 2 screen now. It should now have a text at the end called “processing commands”
Still using the desktop PC press the “Windows Key + R” and type “cmd” without the quotes and hit enter. You will enter the Dos prompt. If you have extracted the contents of the Google Android drivers to C:\ as I mentioned. Follow the example below.
Note: You will need to copy one additional file to the folder of the Google Android folder that you pasted in the C: . Copy and paste whatever clockwork mod “recovery.img” file that you are supposed to use and put that file together with all the other items in the Android folder. Take for instance, the commands will be as such
Cd\
cd\android
fastboot flash recovery recovery.3.0.1.4_clk_1.3.3.img

If nothing goes wrong there should be some text on the Dos prompt indicating flashing complete. I know the whole file recovery.3.0.1.4_clk_1.3.3.img is a little long and difficult to type. You can rename the image file to something shorter and easy like abc.img file to facilitate entering of the Dos commands. The HTC HD 2 will also display messages indicating some data transfer from the computer to the device itself.

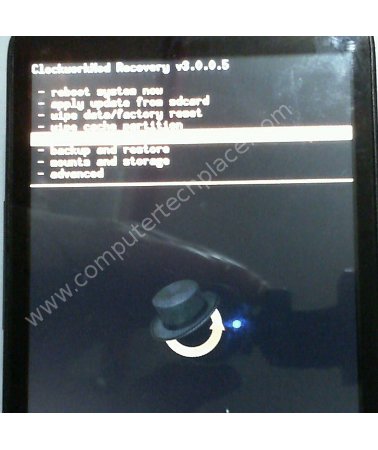
Now to start the clockwork mod recovery, simply unplug the HTC HD 2 from your computer and remove the battery. Now turn it on and hold on to the “Home” button. And hold it there. You will see text loading off the screen and hold it all the way until you enter the screen as shown in the screenshot below

There you go. The clockwork mod recovery is now installed. Simply take out the SD card and copy any Android rom you wish to flash and use this clockwork mod to install. I believe the menus are self explanatory.
If you use the CWM 3.0.14 from the link above, you will get an Orange clockwork mod instead of blue that you see on my screenshot. In the downloadable files attached, I have complied a special clockwork mod that I personally liked. Credits goes to mwakious of XDA for that custom clockwork mod. I liked it because you can turn off your phone and charge. Notice that there is extra options in this new mod compared to the orange version.
If you want to use this, simply download the cLK recovery.zip and extract the contents. Put the cLK_recovery_1.3.3_3.0.1.9.img together with the Android drivers folder that has the fastboot.exe and put the CustomRuu.exe and the RUU_Signed.nbh file together in a folder. Run the CustomRuu.exe to flash your device followed by the fastboot commands. Then you will have the blue cLK recovery.
One additonal tip for users. Any update or file that you wish to install for a Nand build of Android. Rename the zip to “update.zip” before you send it across the SD card. This applies to an App. Sometimes special apps like DSP manager come in the form of a zip. Rename it to update.zip and apply it by using the “apply update” option in the clockwork mod recovery console. And yes, you can only install one update at a time.
I hope this guide is useful for people who are trying hard to install the Clock work mod recovery.
Leave a comment