Install XP Onto Thumb Drive
Having an operating system running directly off a thumb drive can be a useful concept. One of the most useful feature of running XP directly off a thumb drive is that you can simply hook up that thumb drive to get a functioning operating system in the event your current system crashes due to virus or other software issues.
Most of us may not be familiar with recovery programs like BartPE or Linux and most of these programs require at least a functioning computer to create the disc. So when your main computer is already down, you have nothing to create those discs. Therefore it is a good idea to prepare a functioning WinXP running off a thumb drive so that you can hook it up when disaster strikes.
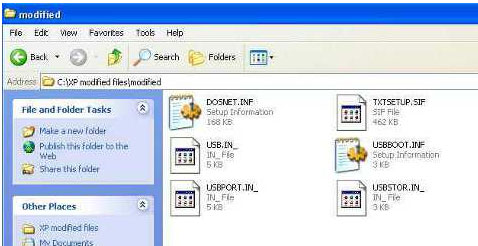
In order to install Win XP into a thumb drive, the Win XP installation disc needs to be modified or else by default, installation of XP onto a thumb drive is not supported. The files that need to be modified are already prepared and can be downloaded here.

You will need to replace some of the files in the “I386 folder “from original Windows XP’s disc with these files. Copy out the contents of the Windows XP disc to the Desktop first so that you can work on the files that need to be modified. After that you will need to burn the modified Windows XP contents to a blank disc.
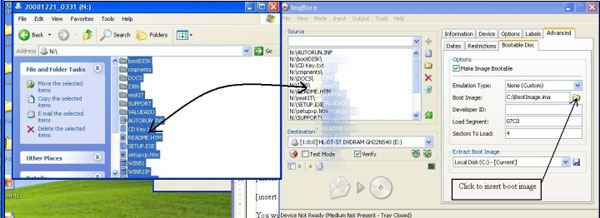
In this example, I will make use of the freeware Imgburn to demonstrate how to create a bootable Windows XP disc. But you can opt to use any preferred burning program of your choice like MagicISO etc. Having those modified contents of a Windows XP disc in a folder on the Desktop, you will now start Imgburn. Select the “Write Files/Folders to disc” option. Click on the “Advanced” Tab => “Bootable Disc”. Put a tick on “Make Image Bootable”. Click on the “Folder icon” and browse for the boot image file. Download this file here and select this file.
Now Drag and Drop the modified Windows XP folder’s contents as shown in the image below and proceed to burn.
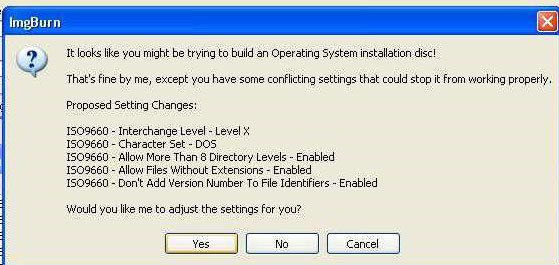
You will get a prompt asking you if you are trying to create a bootable disc. The program will ask you if you will like it to adjust your settings for you. Say “yes”. When the burning is complete, you will get a Windows XP installation disc that can be installed onto a thumb drive.
Before you install the operating system onto the selected thumb drive, it is a good idea to format the thumb drive using a special format utility program. Hook up your thumb drive and format it to NTFS using the format utility program.
Before you being the actual installing of the Windows XP, you will need to disconnect all your existing hard drives and all forms of USB drives including devices that can be assigned drive letters, like SD card readers, printers or even broadband dongles. This is to ensure that only the thumb drive will be given the allocation of the C: first and nothing else.
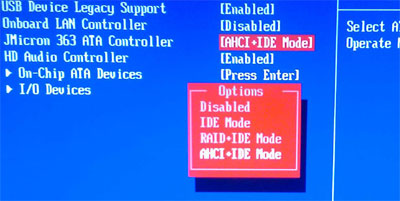
Once the preparation work is done, you can proceed with the installation. Insert the modified WinXP installtion disc and allow it to boot off just like any normal installation of an operating system. If the disc is unable to boot up even if you have already set the boot priority to boot off from disc, check your bios settings for enabling of AHCI.
If for some reason you find that the thumb drive needs to be formatted again, and it is not allocatied a C: after the formatting, hit the reboot button after the format and do the installation again. The thumb drive must be allocated the C: or else the whole installation will be unsuccessful.
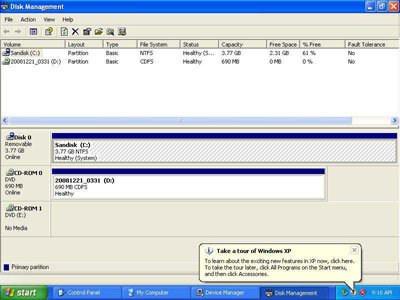
The only issue is that the whole installation is very slow even if you have a fast computer. Since thumb drives do not have any caching files, which is different from normal drives. But at least you have a functioning backup Windows XP in the event a disaster strikes. Check this screen shot for proof that Windows XP is indeed running off a thumb drive without any other drives.
I hope this article on how to install XP onto thumb drive is useful to all readers.

Leave a comment