Tethering For Android Windows 7

 This is an article on how to use Android tethering on Windows 7. Drivers for Android tethering is not easily available on the internet or easy to locate the instructions. More then often, the instructions out there are not the real deal. They will ask you to resort to apps that will require you to install more software on your desktop. The free version of these softwares even blocks site that are HTTPS://. Why is there a need to even pay for tethering software when the feature is built in? Therefore after a lot of painful searching and sourcing for instructions on how to do it, I only stumbled on a set of instructions for Windows XP. Messing with the procedure, I managed to figure out how to do the real Android phone tether on Windows 7.
You only need to install the “tetherxp.inf” driver file attached in this article, when the phone gets detected on the Windows 7 operating system. If you are not tech savvy enough, I have the guide written below.
Tethering For Android Windows 7
Step 1
Hook up your Android phone via USB to your computer running Windows 7. It will get detected as an Android phone. But it will not be able to install the device because it is unable to locate the driver.
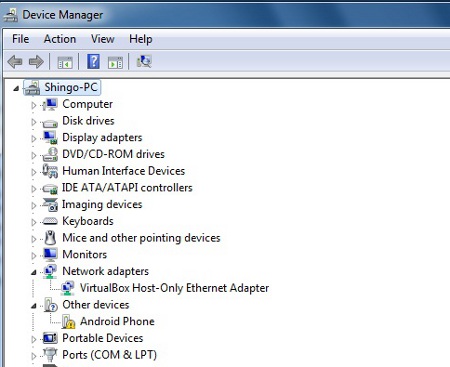
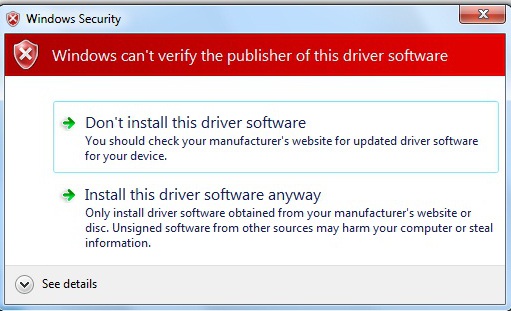
Press the “Windows Key” and go to control panel. Search for device manager or hardware. Right click on the device that reads “Android Phone” and select “Update Driver Software”. Select “Browse my computer for driver software”. Search the file directory for the tetherxp.inf file that you have it pasted. The system will prompt you that it is unable to verify the publisher of this driver.
But it is okay. Just click “Install Driver Anyway”. Allow it to configure itself to install the Android USB Ethernet/RNDIS driver.
Step 2
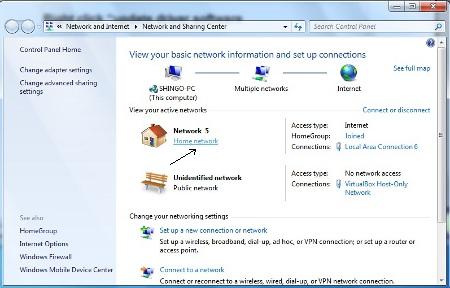
You must be aware of the window that will be popping up after the configuration is done before you can start surfing. This is one additional setting that comes with Windows 7 after a new internet connection is connected. You must minimize all existing windows to check behind them to ensure that this option is not hiding behind all the maximized windows.
You can also reveal the same set of options by right clicking on the network icon on the lower right side of the taskbar and select ““Open Network and Sharing Center”. Click on the hyperlink to change the network to “Home”
Now you should be able to surf online with your Android phone via USB wired tether, I hope this article on how to do Tethering For Android Windows 7 is easy to use.
Attached Files


Hi, Interesting post and thanks for collecting the information to make it work without yet more addons.
Unfortunately it doesn’t work for my HTC Desire (UK name) – it doesn’t recognise tetherxp.inf as a driver file and says “Windows was unable to install your Android Phone. Windows could not find driver software for your device.”
According to Device Manager it matches the HTC Sapphire but isn’t recognised – any ideas?
Hi! Great article, but i have a problem. Android instaled on my phone all the drivers and i also have a new network connecton with IP and everything, but the internet still does not work on my PC 🙁 What can be the problem? Thank you so much!
Works well. Windows 7, Galaxy S2 with Gingerbread 2.3.6.
Brilliant advice.
Hook up your phone, download an unverified driver someone has posted on Mediafire, install it on your Windows box, ignoring security warnings, and then trust to unicorns and fairies that you will be able to connect securely to the internet.
It’s bound to work.
Sorry man, but before posting that mistrusting bullshit you could have loaded the file and watch what it does… assuming you know that .inf is readable text.
I did that, cost me 2 minutes and I can say that there is nothing to mistrust except stupid idiots like you.