Triple Boot Yosemite Windows 8 and Android x86 Hackintosh

Here’s how to do a triple boot Yosemite, Windows 8 and Android x86 Hackintosh in a laptop. All I could say is that I got lucky. It wasn’t easy, but I cracked the puzzle. My steps here are not the only ways to get to the triple boot of Yosemite, Windows 8 and Android in a single laptop. However, I would say that the chronological concept should be applicable for most cases. There will be a lot of preparation work that you will need to embark on. Things that you will need to have.
1. A bootable Yosemite installer thumb drive. If you do not have, read the guide here.
2. EFI Gparted CD – Generally, the default Gparted iso is EFI capable. Your system must be able to boot the disk in EFI mode.
3. An Android x86 bootable USB thumb drive
4. An EFI Windows 8 installer CD – Generally, the original Windows 8.1 retail CD is EFI capable
5. Lots of perseverance and the will power to pull it off even if it takes to lose it all, including your built in restore partition of your laptop.
First of all, some motivation before you get started. Lets watch a video of the final product.
Triple Boot Yosemite Windows 8 and Android x86 Hackintosh
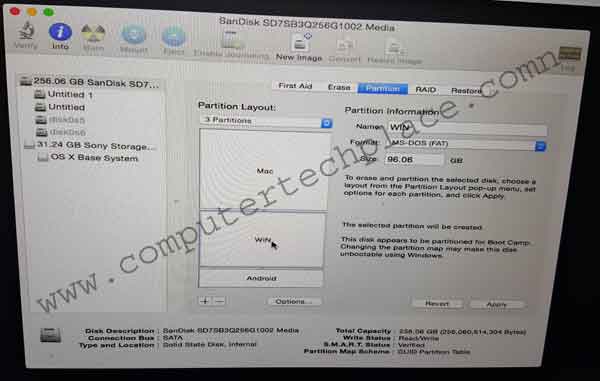
STEP 1 – Boot the Mac OS thumb drive – Create the partitions.
You will have to boot the Mac OS thumb drive and create 3 partitions out of it. I will skip some basic fundamentals as you can refer to the earlier guide on how to install Mac as a standalone. That guide will show you how to create the partitions using disk utility.
Things to take note. You have to create
1. A partition for the Mac OS – Extended Journaled partition
2. A partition for the Windows – FAT partition
3. A partition for the Android at the later stage – But keep the partition as Extended Journaled partition
Important note : Only create the partitions, do not install anything yet. Once the partitions are created, power off the whole computer
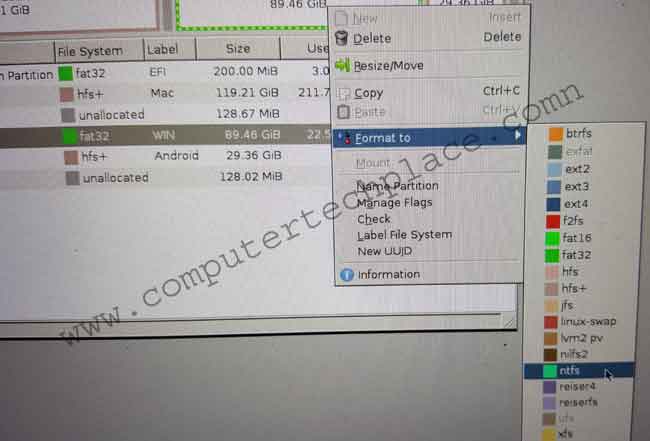
STEP 2 – Boot up the Gparted in UEFI mode.
This means that you insert the Gparted CD and at the boot options, choose Gparted UEFI
In Gparted, format the partition that we have created as FAT to NTFS. Apply changes and leave the other 2 partitions meant for Mac and Android intact.
STEP 3 – Install Windows
Insert a Windows installer disk or thumb drive. The choice is yours. Just make sure it is UEFI. Complete the installation of the Windows. Choose custom upgrade and install the Windows into the NTFS partition that we have just formatted using Gparted.
STEP 4 – Boot Gparted again
At this point, you should get a laptop with a Windows operating system. Just do the initial configuration and leave it. There’s no need to bother with the drivers etc, because you may need to install it again.
In Gparted. Remember to boot UEFI Gparted. Right click on the partition that we have left aside for the Android. Format it to EXT4. Click apply changes and restart the laptop.
STEP 5 – Install Android.
Boot up the Android x86 installer. Surpisingly, for Android, there is no UEFI to talk about. Even though you will have to download the UEFI iso and create a USB installer or a CD installer out of it. Install the Android. There will be some prompts. One thing to take note of is to ensure that you are able to see the partition identifier as per how you see it in Gparted. For instance Ext4. You must be able to select the correct partition. If you are not able to see the partition, then something is wrong somewhere.
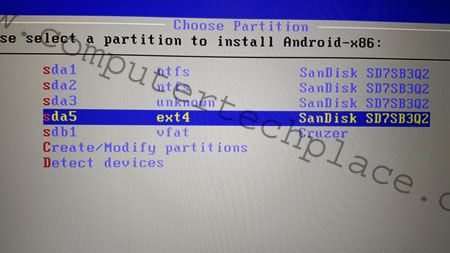
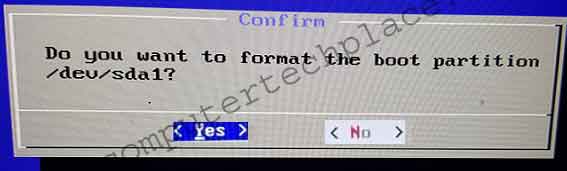
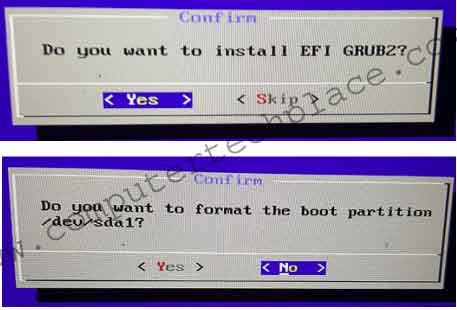
Follow the images as shown, till the point where you have to install the EFI Grub 2, choose yes and yes to format the EFI partition.


Once done, restart your laptop and you will get a Android only laptop. Windows is gone for now.
Step 6 – Install Mac
Boot up the Mac USB thumb drive and install the Mac. The steps on installing the Mac is similar to what you do in the previous guide on how to install Yosemite in a PC. Complete the steps to install Clover till you get a working Mac Clover boot in the Asus laptop.
Step 7 – Optional ( Re-install Windows )
If you are able to get all 3 boot options, then there is no need to continue. However, chances are that you will get a single Mac operating system and that is all. So, shut down the computer and boot up the Windows via EFI mode again. Do the same re-install with custom mode. This time round, you may see a message saying that there is a previous version of Windows detected. Simply format the partition via the Windows interface itself and install over a fresh copy of Windows.
Step 8 – Re-install Android again
You will have to do step 5 again once more, however there is one step that will have to be different. When you get to the part where you are told to install the EFI boot loader and do you wish to format the partition? Say Yes to install the EFI boot loader but no to formatting of the EFI partition.
Step 9 – Checking the Windows and Android dual boot
Restart your computer and this time round, you should get an Android boot loader with options to boot to Windows and Android.
Check both Windows and Android if they are bootable and working fine. If any of them fail to work, you might have to re-do both again.
Step 10 – Boot into Mac
Connect the Mac Yosemite USB installer as the bootable drive, you should see a few bootable options now. Boot into the Mac local disk partition. Note, boot into the Mac partition in the laptop, not to boot into the thumb drive and re-install all over again.
Inside the laptop’s Mac OS that you have already successfully installed. Install Clover one more time onto the laptop’s drive.
This time round, you should get a functioning Mac boot loader that allows you to boot Mac and Windows.
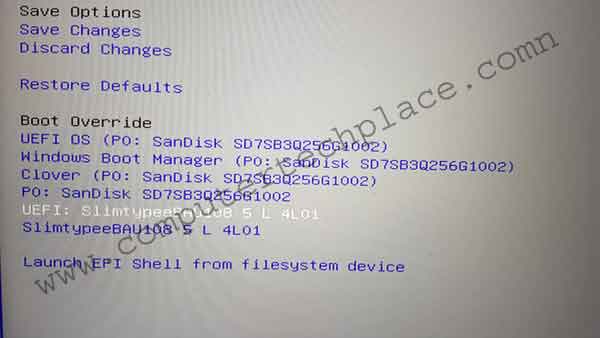
STEP 10 – Add an extra boot option in the Asus Bios.
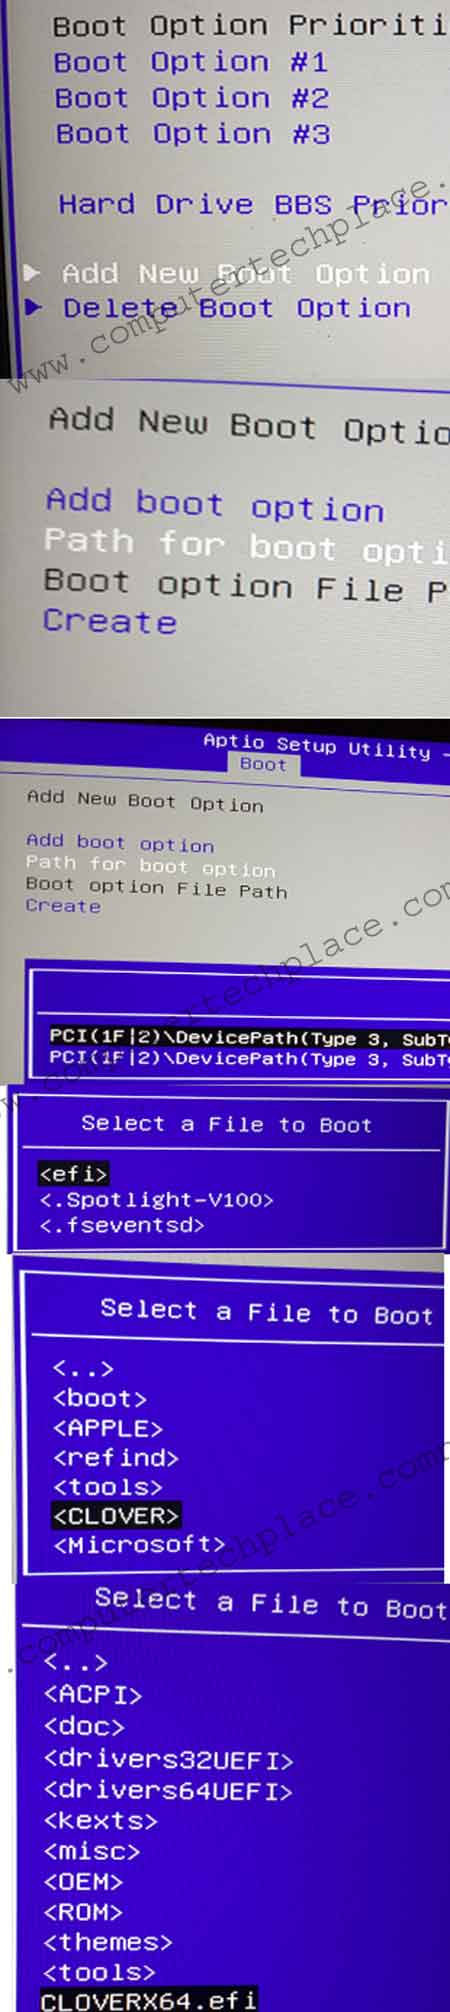
Enter the Bios Setup of your laptop, add an extra boot option. You will have to navigate to the Mac’s EFI folder and choose the Android boot loader .EFI file that you have installed earlier. Depending on which boot loader is missing from your computer, you will add the one that you need.
What we have done is to create 2 sets of dual boot EFI loaders.
1. Mac and Windows Clover boot loader
2. Android and Windows boot loader.
So depending on the boot loader that ends up being the one that is being used as a default at the end stage, you will have to add the other boot loader in the BIOS.
After which, you can use the BIOS to do a swap of the 2 boot loaders to choose between Android or Mac or Windows.
Congrats if you are successful.
I may not be entirely correct with my explanation, but based on what I can conclude with my limited IT skills. I will do a bit of explanation in case you are wondering why there is a need to install Windows and Android 2 times. I do not wish to do all these extra steps too. But I have failed so many times till eventually, I get it right.
The concept is basically to partition the drive with Mac so that the drive sectors will contain some Mac descriptive command lines to trick the Mac into thinking that this is a Mac partitioned drive. However we do not install Mac first, if not Windows and Android will have a problem installing itself. So we installed the Windows first and Android to be seat warmers. In this way, there will be no way for the Mac OS to lock down the entire drive.
Eventually when Mac OS is installed last, it can only work on the partition that it is agreeable with, which is the first HFS partition. Even though there are lots of funny Windows and Android boot partitions in there, it does not care.
When we finally install Clover. Clover becomes the bridge where by Android and Windows is able to write to that Clover Boot loader. This is because, Clover bootloader is a 3rd party bootloader that is supposed to support any boot option. Remember that we managed to install Windows and Android till we get a boot option that has Windows and Android together? Clover backs up that Windows boot loader while it creates a Mac and Windows Boot loader. Thus we eventually went into BIOS to add the backed up boot loader. Bingo. Sherlock Homes has cracked the case.
It isn’t too hard now to understand what happened isn’t it? I hope you enjoyed this article on how to do a Triple Boot Yosemite Windows 8 and Android x86 Hackintosh
Leave a comment