Install Windows 7 Dual Boot VHD
Installing a Windows 7 and doing a Dual boot VHD has several advantages. The VHD can serve as a backup operating system should your r main Windows crash one fine day. You can easily swap over to the backup and copy out everything that matters to you and can get online for the time being before you have the time to do a full format. Thus, I thought by installing a Windows 7 via a VHD and doing a dual boot is one of the most useful concepts, but yet least utilized.
Installing Windows 7 and doing a dual boot might not be something that is alien. If you are pretty tech enough, you would have an idea on how to do a dual boot in the easiest way, and that is to install the operating systems in a chronological order. The newer operating system will be able to create the boot record and all you have to do is resize your hdd before hand with some free software which will allow you to create an extra partition that can be used for the new installation.
However, doing a dual boot via an old school partition style has its perks and disadvantages. Speed wise, doing a partition based dual boot will be the better option, however, the cons will be lots of loose files all over the place. You won’t even know which file can be deleted or it belongs to the main OS or the VHD.
Install Windows 7 Dual Boot VHD
Step 1 – Create a VHD
The easiest way to create a VHD is to use the diskmgmt.msc command. It brings up the graphical user interface for you to define how large, and where you intend to put the VHD . Normally, placing it in the c:\ is the best bet, this will simplify the installation of Windows later as you do not need to navigate all over the place trying to locate the file with Dos commands.
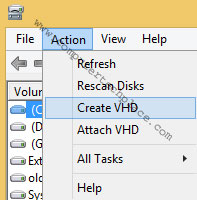
Press the Windows + R and type diskmgmt.msc and press enter.
Click on Action and choose Create VHD
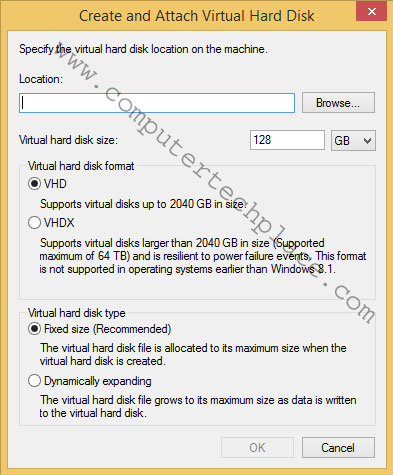
Define how large you want the VHD to be. If it is only a backup emergency system with no intention to use it as a long term system, I recommend at least 50 Gig, so that there is enough space for all the configuration to go through and some updates.
Wait for the VHD to be completed, and you will see a file show up in the C: It will be good to give a simple name so that it won’t kill you later when you try to get the command correct with a super long descriptive name.
Step 2 – Install the Windows
Insert your Windows CD and restart the system. Remember to set the BIOS settings to boot off the CD drive as the first priority. Once you have entered the Windows installation screen. Press Shift + F10 to bring up the Dos prompt.
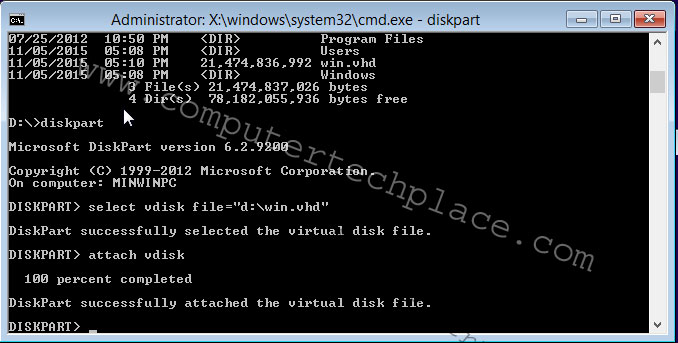
This is the part where you will have to locate your VHD . I recommend that you run some basic commands to locate the vhd first, as the VHD can be located in a different path that you might believe it to be. Use the dir to find the vhd and once you have determined the location of the VHD . Use the following commands to attach the VHD .
Diskpart
select vdisk file="c:\test\test.vhd" (Please take note to replace the path and filename accordingly)
Attach vdisk
Step 3 – Continue with the installation
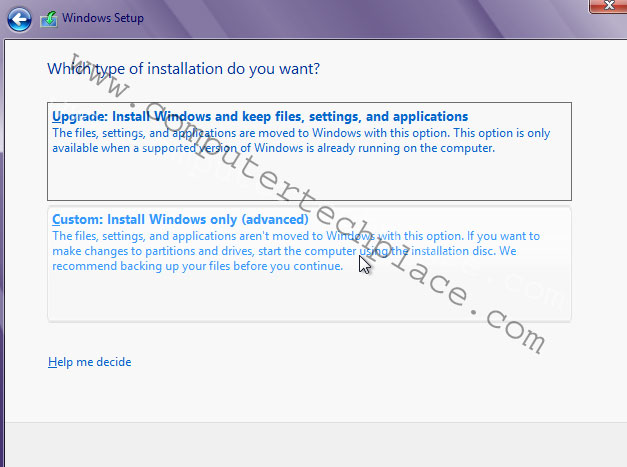
Once you have attached the vdisk, you will find a new drive that is selectable during the installation phase. Please choose custom install instead of a normal install. You will notice a message that this drive is not supported etc, but do not worry, simply choose it and click continue.
Step 4 – Install complete.
The rest of the installation steps are self-explanatory. Once you are done with your installation, you will notice a dual boot option when you do the next restart of your computer. Do note that if you are using Windows 8, you will only be able to see the dual boot menu only if you do a real restart. If you do a shutdown, you will not get to see that dual boot option.
This guide on how to do a dual boot via virtual hard disk is very useful for a few reasons.
- You can easily copy the VHD file by booting into the main operating system and save it somewhere else in the drive. That way you can always copy and replace the VHD by means of bootable CDs, by doing so, you are actually refreshing or doing a backup of your operating system without expensive software or having to know rocket science.
- This VHD can be the “guinea pig” whereby you can install certain software whereby you are unsure if it is safe to use. Only when you have used this software on the VHD for a few months and you are sure that there is no malware. You can decide to install it on the main operating system you are using.
I have written this guide as a follow up to a previous guide on how to restore a broken iPhone. In that guide, I realized that it would be extremely helpful to give iTunes a fresh operating system while doing a refreshing of the iOS. Thus, a VHD concept would be very relevant.
Leave a comment