Install Mac OS X Snow Leopard Onto Compaq Laptop

![]() Installing Mac OS X Snow Leopard onto Compaq laptop may sound like a difficult task. Luckily, there is a very easy way to install Mac OS X Snow Leopard onto any laptop without the need to do any complex Mac commands. The whole entire process should be simple enough for anyone to understand even if you are a Windows user. A lot of images and screenshots will be attached to facilitate ease of understanding.
Installing Mac OS X Snow Leopard onto Compaq laptop may sound like a difficult task. Luckily, there is a very easy way to install Mac OS X Snow Leopard onto any laptop without the need to do any complex Mac commands. The whole entire process should be simple enough for anyone to understand even if you are a Windows user. A lot of images and screenshots will be attached to facilitate ease of understanding.
First and foremost, you will need to try and get a laptop that has almost exact configuration with one of the Macbooks on sale. The video card and the CPU can be of different make and model. But at least, try to buy a rig with the same CPU speed and amount of rams. For the rams, you will need to set the rams to be 2 sticks of 2 Gig for the initial installation. Or else you may or may not succeed in the installation. This article will also cover multi-booting of Mac OS X Snow Leopard with other operating systems. Files will be attached at the end of the article.
Step 1
Preparation
There are a lot of files to download, therefore it is a good idea to download or prepare all these stuff. You will also need a copy of the retail version of the Mac OS X Snow Leopard. The things you require are listed below.
1. A copy of the retail version of Mac OS X Snow Leopard
2. A copy of the Windows operating system
3. A copy of Ubuntu installation CD
4. A copy of the Mac OS X comboupgrade
5. A copy of the Multi-beast
6. A copy of the iboot bootable disc.
But for a Compaq laptop, the latest iboot from tonymac forum will result in issues related with keyboard and touchpad. But it is a lot easier to boot up and perform the installation. You do not need to go through the safe mode with the newer iboot releases. If you encounter issues with the latest version of iboot, download the older version attached at the bottom of the article.
Step 2
Installation
Download and create the iboot disc that is meant for your laptop. The version you are supposed to download is determined by your graphic card and processor. If you are using laptops with the newer “Sandy Bridge” systems, please download the new one from tonymac. Burn the downloaded ISO image and insert the disc into your laptop drive. Simply allow it to load off by setting your laptop to boot off the drive as if you are installing a fresh operating system. You will be able to see the iBoot interface in a short while
Once you are able to see the black screen with a iboot disc icon, eject your drive and insert the Mac OS X Snow Leopard installation disc into the drive. Hit F5 and wait for the disc to be detected. You will now notice that the iboot disc is now the Mac OS X dvd.
You can opt to use the USB installer instead of a normal CD. It is faster to install Mac OS X this way then using DVD. However, using the USB thumb drive as the installer might result in strange errors such as waiting for root device or even hang in mid way. If such a thing should ever occur, power down the system and unplug the power. Try to turn it on with the power unplugged. Make the system forget everything, then try to boot up again. If you already have a functioning Mac OS installed, the USB Snow Leopard thumb drive may not be able to boot into the interface. If this should ever occur, you must use the conventional method of using iboot disc followed by a DVD.

You may now hit enter to start the installation. If in any event, the installation do not go through and gets stuck in a white screen with a Mac logo, restart the installation again and this time round, before you hit enter, key in “-v -x” without the quotes. There is no prompt to look for, just press the keys on your keyboard when the DVD is detected and you will notice those words at the lower left bottom of the screen. Note that there is a space between the -v and the -x.
The loading process will take quite a while, if you are going for the safe mode “-v -x”, you should see a lot of text flying across the screen for approximately 10 mins. After that you should enter the installation screen. For a fresh installation, you will need to create the Mac partition first. Do not click on “Continue” yet. Click on the “Utilities” at the top right of the screen. There is actually a menu at the top of the installation page. Select the “Disk Ultility” to prepare your hard disk.

Now you should see the Mac partitioning page. Click on the hard disk and you should be able to see a “partition” tab on the right options. You will not get to see the “partition” tab if you click on any of the partitions and not the drive. If you click on the “partition” tab, you will get to choose an automated partitioning selection options. Click on the “Volume Scheme” and you will get a drop down menu to select how many partitions you want to create. You can choose 4 partitions for example and the disk utility will split the drive into 4 parts for you. After which you can re-adjust the sizes manually to your own preference. You can also rename them to what you intend to use as. Note that at least one partition must be set to “Mac OS Extended (Journaled)”. For the partitions that are intended for Windows, you can set to “MS Dos”.

Once you are satisfied with the sizing, you can click on “Apply”. You can close that window when the partitioning is complete. Now you can proceed with the installation of Snow Leopard. If you did the partitioning correctly, you should get to choose the partition to install the Snow Leopard in. The copying of files will take approximately 45 mins. You may get to see the “install failed” screen for some models of laptops.

At this point in time you can press and hold the power button for 5 secs to turn off the laptop. Turn it on again and insert the iboot bootable disc and allow it to boot up. This time you should see more boot options.

Use the arrow keys to select the Snow Leopard partition and hit enter to load. If you fail to enter the Mac operating system, repeat the above steps and include the “-v -x” to start the Mac operating system in safe mode. If everything goes smoothly, you should be able to kick off the configuration of the Mac OS X. Follow the instructions on screen to set your keyboard, regional settings, time etc.
Step 3
Updating
Tansfer the Multi-beast and ComboUpgrade across to your Desktop first. Install the ComboUpgrade first, do not reboot. Install Multi-beast now. Multi-beast will install the necessary files for a bootable Mac OS without relying on the iboot disc. Run the latest Multi-beast program that you can download from tonymac forums. Simply put a tick on the following options.
- EasyBeast install
- System Utilities => Both or All options
- Customization => Boot Options => PCI Root ID Fix
- Customization => System Definations => Mac Pro => 3.1
- Osx68 Software => Kext Helper
- Drivers & Bootloaders => kexts & Enablers => Universal => “Last Voodoo HDA entry”
Reboot….

Step 3.1 (Optional)
Installing Bootloader manually
If you are fortunate enough, all you need to do is install multi-beast and it will install a bootloader into your hackintosh. But if it does not turn out well for you, you will need to do the install of the bootloader manually.
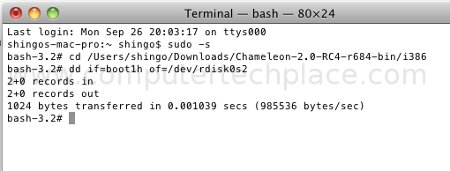
Download the Chameleon boot loader and extract the contents. If you happen to download a version that requires Terminal commands, The version that I have attached is a installer package that does not require all these steps. Simply double click to install. Or else, follow these steps if applicable to you. Click on “Applications” => “Utilities” => Terminal. You will need to key in these commands one by one.
Sudo -s
[Key in your password]
diskutil list
[Identify the partition that your Snow Leopard drive resides]

Get to the folder i386 of Chameleon using the “Terminal”. One easy way to do so is to type “cd” without the quotes. Hit “spacebar” once, then drag and drop the folder into “Terminal”

fdisk -f boot0 -u -y /dev/rdisk0
[ If you keyed in this command correctly, you will not see any response. Else, it will display a whole page of text if you have key in the command in correctly. Note that there is a space between the -f , -u and -y and the 0 is the number “zero”]
dd if=boot1h of=/dev/rdisk0s2
[ This command will install boot1h file onto the bootsector, note that the 0 is number “zero”]

cp boot /
[This command will copy the boot file to the drive, note that there is a space between the boot and the /]
The next series of commands will make the drive active.
sudo fdisk -e /dev/disk0
[Notice that there is a space between the fdisk and -e and the 0 is zero]
f 2
[Replace the number with the number in your Terminal, notice that there is a space between the f and 2. The number 2 is the partition where the Mac OS installation is]
write
y
exit

Step 4
Snow Leopard Kexts
You may not be able to use the touch pad or type on the keyboard for certain laptop models. Use the iboot bootable disc to enter in safe mode and install this Voodoo keyboard package. There’s no need to install the touchpad, just the keyboard plugin should enable both the touchpad and the keyboard. You can try to install the touchpad kext if the touchpad insert working.
There are a lot of other Kexts for devices for other hardware. You will need to Google to check out which Kexts are meant for your hardware.
I will list some of the kexts for a Compaq CQ 40 so that you can get your Snow Leopard running.
1. Keyboard and Touchpad.
Use the iboot disc or simply hit enter during the chameleon boot screen and and enter in safe mode by keying -v -x before hitting enter will allow you to enter Mac OS in Safe mode. This should make your keyboard and mouse operational. Install the Voodoo Keyboard kext that you can find in multi-beast or as a single package installer. If it does not turn out well for you, re-install the Mac OS again and this time round simply complete the whole sequence of installing of the latest ComboUpgrade followed by the multi-beast. Do a reboot and allow it to boot up in normal mode and you should have a functioning keyboard and mouse.
2. USB support for thumb drives.
You may find that thumb drives no longer show up after upgrading to the latest ComboUpgrade. Go to multi-beast and install the USB rollback and reboot. Just make sure that the USB thumb drive is connected before you turn on the laptop and it should get detected. Sometimes it will crap up and refuse to work. You will need to pat your Compaq laptop sometimes and cox it to be a good little baby.
3. Nvidia graphics driver or kexts as they call it.
Download this XDarwin Nvidia installer package and choose the version nearest to your hardware. For a Compaq 103 M mobile graphics, the 9-Series work pretty well. Choose the 9500 GT works great for me. If it crashes during gaming, then try another kept.
4. Wifi support Compaq CQ 40 Snow Leopard Kext
You will need to first install the kext helperb7 app from the multi-beast. Under the OSx86 software category. Then after which, download this BroadcomWifi injector kext. Run the kext helper app from “Applications”, simply drag and drop the broadcom kext into the kext helper and click on easy install. You will need to key in your password. Reboot and your Wi-Fi should be working.
Step 5
Installing Windows
Once you are sure that the Mac OS X Snow Leopard is functioning fine and bootable on its own, you can now reboot and insert the Windows installation CD in the drive. Allow the Windows installation disc to boot off and install it just like you will as if you are installing Windows on a new drive. The only difference is to choose the correct partition you have set for Windows. There should be no problem or fear that the Mac partition gets over written since the Mac partition is locked and cannot be used by Windows.

Once you have rebooted, you will be able to enter Windows but the Mac operating system is no longer bootable. If you intend to have only a dual boot between Windows and Mac, you will need to use the iboot bootable disc to enter Mac OS X. From there, run Multi-beast and install one of the bootloaders. Put a tick on the Chamelon boot loader and install it. You should now get a Mac Boot loader so that you can choose to boot between Mac and Windows.
Step 6
Installing Ubuntu
If you want to do a dual boot between Ubuntu and Mac, all you need to do is insert the Ubuntu CD and do a full installation. At the end of it all, you will get the Linux boot menu and you will be able to boot between Mac and Ubuntu.
If you wish to have Mac, Windows and Ubuntu installed together, you will need to install Mac first, followed by Windows and finally Ubuntu. Except that you will need to manually specify the partitions in Ubuntu. Remember to use manual partitioning in Ubuntu. Here are the instructions on how to set your partition manually.
Click on your partition that is meant for Ubuntu. Select delete. It should now read free space. Now click on the free space and select “Add”. Choose “Swap” and key in a figure that is around twice the value of your rams. This is the usual standard, but you can always set a lower figure, since we have lots of rams these days. Then click on “OK”
Click on the free space again and select “/” for “Mount point”, you will key in the amount of space you wish to allocate for the Ubuntu installation. Put it simple, this is the value you need to set for all the installation files and system files.
You will need to create one more partition before the whole set up is complete. Click on the free space again and this time round select, “/home” for the “Mount Point”. This is the amount of space you want for your home folder. This is the equalvalient to the “Desktop” of the Windows operating system. In short, it is basically the space you wish to allocate for you to download and put your files.
Once you are done with creating of these 3 partitions, you can proceed with the installation of Ubuntu. After the installation is complete, you will get a Ubuntu multi-boot menu that consists of Ubuntu, Mac OS X and Windows 7. However, you can only enter Ubuntu and Mac OS X.
Now you will need to enter Ubuntu to install GPTsync to syncronize the boot records. Update and upgrade your respositories and search for the GPTsync application. Install that package. After which, key in the following commands in the Terminal.
Sudo gptsync /dev/sda

You will receive a message asking you if you want to allow it to update the MBR. Type “y” and you should be able to boot into all 3 operating systems on the next reboot. I hope this install snow leopard onto any laptop tech guide is easy for every one to follow.
Leave a comment